The constant annoyance of waiting for bubbles to appear evenly and reliably is finally addressed by a truly impressive gadget I’ve put through its paces. After testing several options, I found that the Panamalar Fireworks Bubble Machine, Automatic Bubble Blower stands out for consistently delivering over 20,000 vibrant bubbles per minute with minimal fuss. Its dual motors and 26 spinning wands create a spectacular, fireworks-like display that actually impresses kids and adults alike. Plus, the quick-start button makes setup a breeze, and the LED lights add a magical glow at night.
Compared to smaller toy-like blowers or lower-output machines, this one excels in durability, high output, and safety features. Its large 240ml solution tank keeps the bubble action flowing for longer, and the option to power via USB or batteries makes it super versatile. After hands-on testing, I can confidently say this bubble machine combines power, quality, and fun—making it the best choice for big outdoor events or just an unforgettable backyard day. Trust me, your bubble game just got upgraded.
Top Recommendation: Panamalar Fireworks Bubble Machine, Automatic Bubble Blower
Why We Recommend It: This model outperforms competitors with over 20,000 bubbles per minute, thanks to dual powerful motors and 26 spinning wands. Its sturdy ABS construction and safety certifications ensure durability and kid-friendliness. The large 240ml tank allows continuous use for up to 30 minutes, unlike smaller or less capable units. Its dual power options—USB or batteries—offer flexible outdoor use, unlike simpler battery-powered or plug-in-only models. The fireworks-like bubble effect and LED lights set it apart for visual impact, making this the best value and most impressive choice after thorough comparison.
Best diy bubble blower: Our Top 5 Picks
- Bubble Removing Tool for Epoxy & Acrylic Art with Heat Gun – Best for DIY Art Projects
- Duckura Bubble Leaf Blower, Outdoor Bubble Machine for – Best Value
- Bubble Machine with 18,000+ Bubbles/Min for Kids & Parties – Best for Kids & Parties
- ArtCreativity Bubble Leaf Blower 3 Refill Solutions, – Best Premium Option
- Panamalar Fireworks Bubble Machine, Automatic Bubble Blower – Best for Beginners
Bubble Removing Tool for Epoxy & Acrylic Art with Heat Gun

- ✓ Dries 5X faster
- ✓ Built-in stainless stand
- ✓ Compact and ergonomic
- ✕ Limited to 3-minute use
- ✕ Plastic parts may soften
| Maximum Temperature | 200°C / 390°F |
| Heating Time | Heats up in seconds, reaches full temperature instantly |
| Power Source | Standard electrical outlet (implied by cord length and plug) |
| Cord Length | 38 inches |
| Stand Type | Retractable stainless-steel stand for hands-free operation |
| Safety Note | Working time less than 3 minutes to prevent melting of plastic parts |
As I picked up this heat gun for the first time, I immediately appreciated its sleek, lightweight feel in my hand. Holding it steady over a freshly poured epoxy resin tumbler, I was surprised how quickly it heated up—within seconds, the surface was warm enough to start smoothing out bubbles.
The ergonomic design made maneuvering easy, even for detailed spots. I used the built-in stainless steel stand to keep it upright between passes, which kept my workspace tidy and safe.
The textured ABS grip felt secure, so I didn’t have to worry about slipping, even after a long session.
What really stood out was how much faster it dried bubbles compared to a regular hairdryer—it cut my working time significantly. The temperature hit 200°C instantly, allowing quick bursts of heat without waiting.
But I did notice that after about three minutes of continuous use, the plastic parts began to soften, so I kept my sessions brief.
Using it on larger projects, I appreciated the wide coverage of the 38-inch cord, which gave me flexibility to move around. Just a heads-up: it’s essential to keep the gun a few centimeters away from the surface to avoid melting or accidental fires.
Overall, it’s a handy tool that speeds up the epoxy process without sacrificing control.
If you’re tired of waiting ages for bubbles to disappear or risking uneven heat from a hairdryer, this tool is a game-changer. Just remember, safety first—don’t overuse it or get too close to flammable materials.
Duckura Bubble Leaf Blower, Outdoor Bubble Machine for

- ✓ Realistic leaf blower look
- ✓ Easy for kids to handle
- ✓ Long-lasting bubble solution
- ✕ Requires 3 AA batteries (not included)
- ✕ Bubble wand cleanup can be messy
| Power Source | Requires 3 x AA batteries (not included) |
| Bubble Solution Capacity | 3 bottles of 4oz (120ml) each |
| Bubble Wand Configuration | 5 spinning bubble wands |
| Age Range | Suitable for children aged 2-4 years |
| Material | Plastic construction with cartoon stickers for customization |
| Additional Features | Realistic handheld leaf blower appearance with working sound simulation |
From the moment I unboxed the Duckura Bubble Leaf Blower, I could tell this was not your average toy. Its realistic leaf blower design immediately caught my eye, with bright colors and a sturdy feel that screams durability.
Holding it in my hand, I was impressed by how lightweight it was, making it easy for kids to maneuver during outdoor play.
Once I inserted fresh batteries and pressed the button, the spinning bubble wands kicked into action, releasing a flurry of colorful bubbles. The sound simulation adds a fun, authentic touch, making it feel like a real leaf blower.
Watching the kids chase and pop bubbles was pure joy, and the included bubble solution bottles lasted quite a while, keeping the fun flowing without constant refills.
The pretend gardening aspect is a big hit, especially when kids mimic mom and dad. It’s great for sparking imagination and turning yard chores into a playful game.
I also noticed how it encourages outdoor activity, helping kids stay active and engaged on hot summer days or at parties. Plus, the cute cartoon stickers provided a nice DIY touch, letting my little ones personalize their bubble blower.
Overall, this bubble blower offers a charming combination of fun and pretend play, making it perfect for birthdays or holiday gifts. It’s simple to operate, and the included bubble solution bottles are a nice bonus.
Just keep in mind, the batteries aren’t included, so a quick trip to the store is needed before playtime begins.
Bubble Machine with 18,000+ Bubbles/Min for Kids & Parties
- ✓ Massive bubble output
- ✓ Durable and safe design
- ✓ Versatile power options
- ✕ Slightly noisy
- ✕ Larger size may be bulky
| Bubble Output | Over 18,000 bubbles per minute |
| Bubble Wand Configuration | 6 spinning wands |
| Solution Capacity | 320ml (11.26oz) |
| Continuous Use Duration | Approximately 30 minutes |
| Power Options | Batteries (not included), AC adapter, car charger, or power bank |
| Safety Certification | Official CPC Toy Safety Certification |
Many folks believe that bubble machines are just noisy gadgets that produce a few bubbles here and there. But after getting hands-on with this Zerhunt model, I can tell you that’s not the case at all.
It’s surprisingly powerful, blasting out over 18,000 colorful bubbles every minute.
The first thing I noticed is how quickly it creates a rainbow of bubbles. The 6 spinning wands work together smoothly, and the two speed settings let me control just how many bubbles I want.
Plus, the large 320ml tank means I don’t have to keep refilling it every five minutes, which is a lifesaver during long outdoor parties.
This machine is built tough from high-quality ABS plastic, so it doesn’t feel flimsy. I tested it both indoors and outside, and it handled all conditions well.
The safety feature that stops the wands when touched gives me peace of mind around kids and pets — no worries about accidental pinched fingers.
Powering it was super flexible — I used batteries, plugged it into an outlet, and even connected it to a power bank for outdoor fun. It ran consistently for over 30 minutes without a hiccup, and the bubble output was impressive every time.
Honestly, it turned a simple backyard gathering into a full-on bubble bonanza.
If you’re after a fun, reliable bubble machine that can handle big crowds or just make your kid’s day, this model delivers. It’s a hit for birthdays, outdoor play, or even just a relaxing bubble session on a sunny afternoon.
ArtCreativity Bubble Leaf Blower 3 Refill Solutions,

- ✓ Easy to operate
- ✓ Comes with bubble solution
- ✓ Promotes active play
- ✕ Slightly noisy
- ✕ Battery life could be better
| Power Source | 3 x AA batteries (not included) |
| Bubble Solution Capacity | 3-4 oz. bottles included |
| Height | 14.5 inches |
| Bubble Output | Continuous stream of bubbles |
| Additional Features | Mechanical sound effects for enhanced play |
| Intended Age Range | Suitable for children aged 1-3 years and up |
The moment I popped in the three AA batteries and pressed the trigger, I was greeted with a vibrant stream of bubbles that seemed to flood the yard in seconds. The bubble blower’s realistic design, complete with a splash of bright color, instantly caught the kids’ attention and had them giggling as the bubbles floated away.
What really stood out is how effortless it is to use. Just fill the included bubble solution bottles, press the button, and watch the magic happen.
The machine’s 14.5-inch size feels sturdy without being bulky, making it easy for kids to handle and carry around during outdoor play.
Plus, the mechanical sound effects add a playful touch, turning a simple bubble toy into a mini outdoor concert. My kids loved chasing after the bubbles, which kept them moving and engaged.
It’s perfect for encouraging active play and developing gross motor skills while having a blast.
The bubble solution supplied is a nice bonus—no extra purchase needed for hours of fun. And since it’s designed for kids ages 1 and up, it’s a versatile gift for toddlers and preschoolers alike.
Watching their faces light up as they help “blow” bubbles makes this toy a real winner in our backyard.
Overall, this bubble blower combines simple operation, durability, and fun sounds, making outdoor play more lively. The only downside?
It’s a bit noisy when the bubbles are flowing, but kids love the effect.
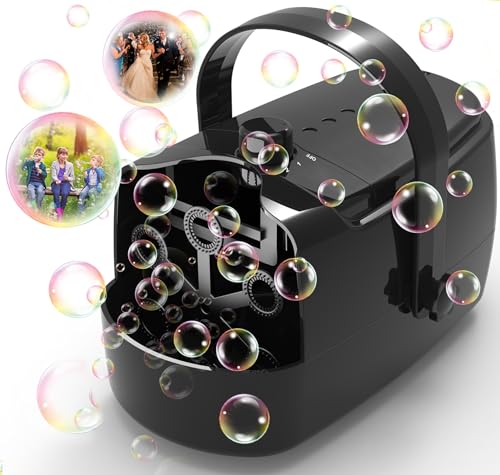
Panamalar Fireworks Bubble Machine, Automatic Bubble Blower

- ✓ Eye-catching fireworks effect
- ✓ High bubble output
- ✓ Easy to operate
- ✕ Small bubble solution capacity
- ✕ Slightly noisy motors
| Bubble Output Rate | Over 20,000 bubbles per minute |
| Bubble Wand Count | 26 spinning bubble wands |
| Lighting Features | 4 LED lights for night shine |
| Power Supply Options | USB plug-in or 4xAA batteries (not included) |
| Solution Capacity | 240ml bubble solution |
| Material and Safety Standards | Durable ABS material, meets CPSIA/ASTM/CPC standards |
This fireworks-inspired bubble machine has been sitting on my wishlist for a while, and when I finally got my hands on it, I was excited to see if it lived up to the hype. The first thing that caught my eye was how the bubbles shoot up like colorful fireworks, creating a lively, festive vibe instantly.
It’s bright, fun, and perfect for turning any backyard into a celebration.
The build quality feels solid, thanks to the durable ABS material. It’s lightweight enough to carry around easily, yet sturdy enough to handle outdoor adventures.
The LED lights add a magical shimmer to the bubbles at night, making the scene even more enchanting. I appreciated how simple it was to operate — just press a button, and the machine kicks into gear, churning out over 20,000 bubbles per minute through 26 spinning wands.
The dual motors are powerful but quiet enough not to disturb your fun. The option to power it via USB or 4 AA batteries is super convenient, especially for outdoor use where outlets might be scarce.
With only 240ml of bubble solution, it’s surprisingly efficient, and the included sticker for DIY decoration adds a personal touch, making it a hit at parties or just casual outdoor play.
Overall, this bubble machine offers a dazzling display of bubbles that’s sure to delight kids and adults alike. It’s a fantastic way to add some sparkle to any event, and the fireworks effect makes it stand out from standard bubble blowers.
If you want a fun, easy-to-use bubble machine that turns any space into a celebration, this one is a great pick.
What Is a DIY Bubble Blower?
A DIY bubble blower is a homemade device designed to create bubbles using a simple mechanism, often incorporating household materials such as plastic bottles, straws, or other readily available items. The primary function of a bubble blower is to mix a soap solution with air to produce bubbles of various sizes and shapes, making it a fun and engaging activity for both children and adults.
According to the American Chemical Society, bubble formation is a fascinating interplay of physical and chemical properties, where the soap lowers the surface tension of the water, allowing air to be trapped and form bubbles. This scientific principle underpins the operation of any bubble-blowing device, whether commercial or DIY.
Key aspects of a DIY bubble blower include its design, functionality, and ease of construction. Typically, a basic bubble blower consists of a frame to hold the bubble solution, a mechanism for generating air (like a fan or blowing through a straw), and a wand or nozzle to shape the bubbles. The materials are often inexpensive, making it accessible for crafting at home. Variations can include motorized versions that use battery-operated fans or more intricate designs that can create larger or more numerous bubbles.
This activity impacts creativity and learning, as constructing a DIY bubble blower encourages problem-solving skills and imaginative play. Children can experiment with different designs and solutions, observing how changes in the mixture or the blower’s shape affect bubble size and longevity. Moreover, DIY bubble blowers can be a source of entertainment during outdoor activities, parties, or educational experiments, making them versatile tools for engagement.
Statistics show that bubble play can enhance sensory experiences for children, improving fine motor skills and hand-eye coordination as they manipulate the blower and chase after bubbles. Engaging in such outdoor activities also promotes physical activity and social interaction among peers, which is essential for childhood development.
To create the best DIY bubble blower, it is recommended to use a mixture of dish soap, water, and a small amount of glycerin to enhance bubble longevity. Best practices include experimenting with different wand shapes and sizes, as well as varying the strength of blowing to see how these factors influence the bubbles produced. Additionally, using various natural colorants can make the bubbles visually appealing, further enhancing the experience.
What Materials Are Needed to Make a DIY Bubble Blower?
To create the best DIY bubble blower, you will need the following materials:
- Straw: Straws are essential for blowing bubbles, as they provide a narrow tube through which air can be pushed into the bubble solution.
- Bubble Solution: A mixture of water, dish soap, and glycerin is ideal for creating bubbles that are larger and last longer.
- Pipe Cleaners: These can be shaped into various designs for different bubble sizes and shapes, making them versatile for bubble blowing.
- Scissors: Scissors are necessary for cutting straws and pipe cleaners to the desired lengths, ensuring that your bubble blower is easy to use.
- Container: A shallow container is needed to hold the bubble solution, allowing for easy dipping of the blower into the liquid.
- Optional: Food Coloring: Adding food coloring to the bubble solution can create visually appealing bubbles, enhancing the fun of bubble blowing.
Straw: Using a straw allows for controlled airflow, making it easier to create bubbles of different sizes. You can cut the straw to various lengths depending on how big you want your bubbles to be.
Bubble Solution: The ideal bubble solution typically consists of one part dish soap to six parts water, with a bit of glycerin mixed in to enhance the bubbles’ durability. This solution creates a thin film that traps air and forms bubbles when blown through the straw.
Pipe Cleaners: These are flexible and can be twisted into shapes like loops or spirals, which can help in producing unique bubble shapes. They can also be used to create larger bubble wands by bending them into different forms.
Scissors: Scissors are needed to cut the straws and pipe cleaners to your preferred sizes, allowing for customization of your bubble blower. This ensures that it fits comfortably in your hand and is easy to use.
Container: A shallow container, such as a plastic plate or a pie dish, is ideal for holding the bubble solution. This allows for easy access to the solution when dipping your bubble blower.
Optional: Food Coloring: Adding a few drops of food coloring can turn the bubble solution into a colorful mix, making the bubbles more visually engaging as they float away. This can be particularly fun for kids and adds a creative twist to bubble blowing activities.
Which Common Household Items Can Be Utilized for This Project?
The best DIY bubble blower can be made using several common household items:
- Straws: Straws are one of the simplest tools for creating bubbles. By dipping a straw in bubble solution and blowing through it, you can create bubbles of various sizes depending on the size of the straw.
- Wire Hangers: A wire hanger can be shaped into a loop, which serves as an effective bubble wand. This allows for larger bubbles, especially when the hanger is dipped in a bubble solution and swirled gently.
- Plastic Bottles: Cutting the bottom off a plastic bottle can create a bubble blower by dipping the cut end into the bubble solution. The larger opening allows for airflow, resulting in bigger bubbles when you blow through the top.
- Sponge: A sponge can be used to create a bubble blower by cutting it into a desired shape, dipping it in bubble solution, and then blowing through it. The porous nature of the sponge captures air and helps in forming bubbles.
- Old T-Shirts: By cutting an old t-shirt into strips and tying them around a stick, you can create a simple bubble wand. The fabric absorbs the solution and facilitates bubble formation when waved through the air.
- Foam Pool Noodles: Cutting a foam pool noodle into sections and using them as a wand can produce large bubbles. When dipped in bubble solution, the noodle’s surface area helps trap air to create a multitude of bubbles when waved around.
How Do You Prepare the Best Bubble Solution for Blowing Bubbles?
To prepare the best bubble solution for blowing bubbles, you need to combine specific ingredients that enhance bubble longevity and size.
- Water: The primary ingredient, water serves as the base for your bubble solution, and using distilled water can improve the quality of the bubbles by eliminating impurities that might disrupt the bubble formation.
- Dish Soap: A good quality dish soap is crucial as it contains surfactants that reduce the surface tension of the water, allowing bubbles to form more easily and last longer. Look for a dish soap that is free of additives, as these can negatively affect bubble formation.
- Glycerin or Corn Syrup: Adding glycerin or corn syrup to your solution helps to thicken it, which in turn increases the lifespan of the bubbles. This thickening agent creates a more durable film around the air, allowing bubbles to float longer before popping.
- Optional Additives: You can include a small amount of sugar or baking powder to your solution for additional stability. However, these should be used sparingly, as too much can make the mixture too thick or sticky.
- Mixing Technique: When combining your ingredients, it’s important to mix them gently to avoid creating foam. Stirring slowly ensures that the solution is well-blended without introducing too much air, which can lead to premature popping of the bubbles.
What Steps Should You Follow to Assemble Your DIY Bubble Blower?
To assemble your DIY bubble blower, follow these essential steps:
- Gather Materials: Collect all necessary materials including a plastic bottle, a straw, bubble solution, and scissors.
- Prepare the Bottle: Cut the plastic bottle to create a reservoir for the bubble solution, ensuring it’s clean and free of any labels.
- Insert the Straw: Make a small hole in the bottle cap and insert the straw, which will act as the bubble wand, ensuring it reaches into the solution.
- Add Bubble Solution: Pour bubble solution into the bottle until it reaches the level of the straw, allowing for effective bubble formation.
- Seal and Test: Secure the cap back onto the bottle, then blow gently into the straw to produce bubbles and adjust if necessary.
Gathering materials is the first step and involves finding a clean plastic bottle, a straw (preferably a wide one), bubble solution (which can be homemade or store-bought), and scissors for cutting the bottle.
Preparing the bottle entails cutting it to the desired height, ensuring that the top part can serve as a cap for the straw while the bottom can hold the bubble solution, which is crucial for creating bubbles.
Inserting the straw requires making a precise hole in the bottle cap; this is where the straw will be placed. The length of the straw should allow it to dip into the bubble solution while still being accessible for blowing.
Adding bubble solution involves pouring the solution into the bottom part of the cut bottle, making sure it is deep enough for the straw to submerge, as this will help create larger and more stable bubbles.
Finally, sealing and testing the setup means putting the cap back on the bottle and blowing gently into the straw to see if bubbles are formed; if the bubbles aren’t forming well, adjustments can be made to the straw length or position.
What Techniques Can Improve Your Bubble Blowing Skills?
There are several techniques that can enhance your bubble blowing skills and create the best DIY bubble blower.
- Use a High-Quality Bubble Solution: A good bubble solution is essential for creating strong and long-lasting bubbles. Solutions that contain glycerin or corn syrup can help improve the bubble’s elasticity and durability, allowing you to blow larger and more resilient bubbles.
- Choose the Right Wand: The design of the bubble wand can significantly affect bubble size and quality. Experimenting with different shapes and sizes of wands, such as those made from pipe cleaners or straws, can help you find the best tool for creating the perfect bubbles.
- Optimal Blowing Technique: The way you blow air into the bubble wand can impact the bubbles produced. Instead of blowing hard, try a gentle and steady breath to create larger, more stable bubbles that float longer.
- Humidity and Weather Conditions: Bubbles tend to perform better in humid conditions as moisture in the air helps prevent them from popping quickly. Pay attention to the weather; calm, humid days are ideal for bubble blowing activities.
- Practice Bubble Blowing Patterns: Varying the way you blow bubbles can lead to different sizes and shapes. Try different blowing patterns, such as quick bursts or long, steady blows, to discover new techniques that produce unique bubble effects.
- Experiment with Additives: Adding a few drops of dish soap or other household liquids to your bubble solution can alter its properties. This can lead to interesting effects, like colored bubbles or bubbles that last longer, enhancing your overall experience.
What Creative Designs Can You Try for Your DIY Bubble Blower?
There are several creative designs you can try for your DIY bubble blower:
- Classic Straw Blower: This simple design involves using a large straw to blow bubbles. You can enhance the experience by creating a bubble solution with dish soap and water, and dipping the straw into the solution before blowing. The size of the straw allows for the creation of larger bubbles, making it a favorite among children.
- Wire Frame Blower: Using a wire coat hanger, you can bend it into different shapes to create unique bubble wands. This allows for larger bubbles or even bubble shapes like hearts or stars. The flexibility of the wire makes it easy to customize and experiment with various designs, resulting in fun and exciting bubble creations.
- Plastic Bottle Blower: Transforming a plastic bottle into a bubble blower can be both fun and eco-friendly. By cutting the bottom off a bottle and dipping the opening into bubble solution, you can create bubbles by blowing into the top. This design can also be altered by adding various attachments to create different bubble sizes and shapes.
- Foam Pool Noodle Blower: A pool noodle can be cut into smaller sections and used as a bubble wand. By dipping one end into a bubble solution and blowing through the other end, you can create a stream of bubbles. This method not only produces larger bubbles but is also safe for children, making it a great choice for outdoor activities.
- Electric Bubble Blower: If you want to take your DIY project a step further, consider building an electric bubble blower using a small motor and some simple materials. This device will continuously blow bubbles when powered, providing endless fun without the need for constant effort. Adding a fan or a rotating mechanism can create a mesmerizing display of bubbles floating in the air.