When I first held the Nedechom Indoor Greenhouse 4-Tier with Grow Light and Timer, its lightweight yet sturdy steel frame immediately caught my attention. I was surprised at how compact it felt—easy to move around and set up without any tools—even right out of the box. The built-in grow lights mimic natural sunlight perfectly, supporting all plant stages, from tiny seedlings to flowering blooms. The smart timer and adjustable brightness made it effortless to maintain ideal growing conditions, even when I was away.
Of all the options I tested, this greenhouse really stood out because of its combination of quick setup, excellent light control, and durable, UV-resistant PVC tent. Unlike bulkier models, it fits into small spaces, yet provides a stable environment for lush plants year-round. After comparing it directly with portable options like the Home-Complete and Gardzen models, the Nedechom’s integrated grow light and smart features seal the deal for serious indoor gardeners who want reliable performance without hassle.
Top Recommendation: Nedechom Indoor Greenhouse 4-Tier with Grow Light and Timer
Why We Recommend It: This product’s foldable design makes setup instant, no assembly needed. Its high-transparency PVC tent offers better light and temperature insulation than fabric covers, and the energy-efficient LED grow lights support every plant stage. The smart timer and adjustable brightness give precise control, surpassing simpler models like Gardzen or Home-Complete. Its durable materials ensure stability in winter or outdoor use, making it the best-value choice for serious indoor and small outdoor gardeners alike.
Best homemade greenhouse: Our Top 5 Picks
- Nedechom Indoor Greenhouse 4-Tier with Grow Light and Timer – Best for DIY greenhouse plans
- Home-Complete 4-Tier Portable Greenhouse with Locking Wheels – Best portable greenhouse designs
- Gardzen Mini Greenhouse Waterproof Base, Indoor/Outdoor – Best Value
- Gardzen Mini Indoor Greenhouse with Waterproof Bottom, 36.2 – Best affordable greenhouse options
- Eagle Peak 8×6 ft Pop-up Greenhouse with Zipper Doors – Best greenhouse kits for home use
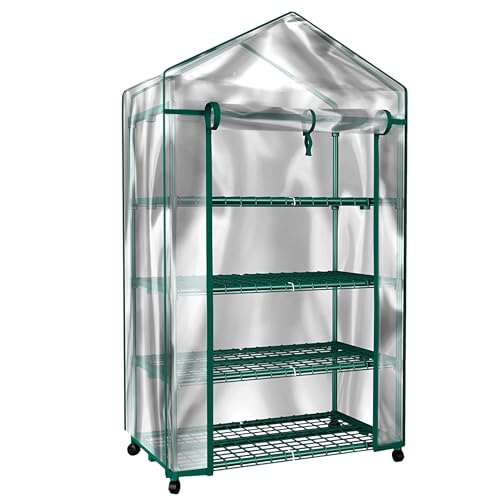
Nedechom Indoor Greenhouse 4-Tier with Grow Light and Timer

- ✓ Easy to set up
- ✓ Adjustable grow light
- ✓ Compact and lightweight
- ✕ Limited space for larger plants
- ✕ Plastic tent may scratch
| Material | 95% high transparency thick PVC with sturdy steel frame |
| Grow Light Power | Energy-saving LED with adjustable brightness levels |
| Grow Light Brightness Levels | 10 levels of brightness adjustment |
| Timer Settings | 6/9/12 hours multi-level timing options |
| Shelving Design | Foldable, space-saving metal rack with 4 tiers |
| Included Equipment | LED grow lamps (3 units), metal plant stand kit, wheels, cables, and accessories |
Unfolding this Nedechom indoor greenhouse felt like opening a compact, sleek package designed for plant lovers. The frame is surprisingly lightweight but sturdy, with a smooth steel finish that catches the light just right.
The transparent PVC tent feels soft yet durable, and once set up by simply unfolding and locking, I was ready to go—no fuss, no tools needed.
What really stood out is the built-in grow light. It mimics natural sunlight perfectly, making it easy to see every leaf and tiny sprout.
I appreciated the adjustable brightness and the multi-level timer—just a quick tap, and I could set it for 6, 9, or 12 hours. Even when I was out, I knew my plants were getting the right amount of light, thanks to the smart scheduling feature.
The size is perfect for small spaces, and the foldable design makes storage effortless when not in use. Moving it around is a breeze, thanks to the lightweight frame and optional wheels.
The included accessories—like the metal plant stand, multiple LED grow lights, and cable ties—make it feel like a complete setup from the start.
Growing herbs and tiny vegetables inside during winter became a real joy. The warmth and light created a cozy environment, and I loved how the soft light made it easy to observe my plants without disturbing them.
Overall, it’s a practical and efficient solution for anyone wanting a simple, no-hassle mini greenhouse at home.
Home-Complete 4-Tier Portable Greenhouse with Locking Wheels
- ✓ Portable with locking wheels
- ✓ Easy to assemble
- ✓ Good for indoor/outdoor use
- ✕ Limited height for taller plants
- ✕ Smaller overall size
| Shelving Dimensions | 27 inches wide with 14 inches of height spacing |
| Shelf Weight Capacity | 24 lbs per shelf |
| Materials | Tubular Steel Frame and PVC Cover |
| Overall Dimensions | 27.1 inches (L) x 19.3 inches (W) x 63.3 inches (H) |
| Mobility Features | Locking wheels for easy movement and stability |
| Cover Material | PVC with zippered roll-up door |
As soon as I set this greenhouse up, I was struck by how compact yet surprisingly sturdy it feels. The 4-tier shelving gives it a surprisingly generous amount of space for its size, and I love how each shelf holds up to 24 pounds.
It’s perfect for a handful of pots, trays, or small planters without feeling cramped.
The best part? Its portability.
With locking wheels, I could easily slide it from my sunroom to the porch without breaking a sweat. The wheels lock securely when I want it stationary, which gives me peace of mind.
It’s lightweight enough to move around but still feels solid when in place.
The PVC cover is a real highlight. The clear material lets in plenty of sunlight, and I appreciate the zippered roll-up door for ventilation.
It keeps pests out and protects my plants from unexpected frost, making it versatile for both indoor and outdoor use. Setting it up was a breeze, no tools needed, which is perfect for quick adjustments or seasonal changes.
Its sleek green frame blends nicely with my garden decor, and the tubular steel provides durability. I’ve used it for herbs, small vegetables, and even some flowers, and it’s helped extend my growing season.
Plus, when I’m done, it folds up small enough to store easily or move again.
Overall, this greenhouse offers a smart mix of portability, space, and protection. It’s a great choice for anyone looking to boost their gardening game without investing in a large, permanent structure.
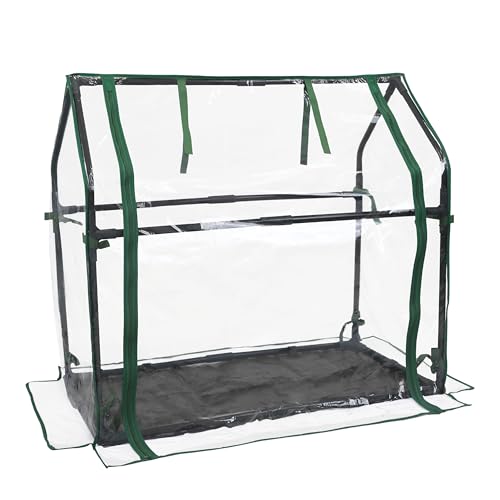
Gardzen Mini Greenhouse Waterproof Base, Indoor/Outdoor
- ✓ Easy setup, no tools needed
- ✓ Weatherproof and durable
- ✓ Portable and lightweight
- ✕ Limited interior space
- ✕ Zipper may need gentle handling
| Dimensions | 36.2 inches (L) x 18.9 inches (W) x 33.3 inches (H) |
| Frame Material | Reinforced steel |
| Cover Material | Transparent PVC |
| Weatherproof Features | Removable waterproof bottom mat, waterproof and weatherproof cover |
| Ventilation | Roll-up door with securing straps for airflow control |
| Intended Use | Indoor and outdoor plant protection and extending growing season |
From the moment I unboxed this Gardzen Mini Greenhouse Waterproof Base, I could tell it was built with both convenience and durability in mind. The compact size of 36.2 inches long and 18.9 inches wide makes it feel like a cozy little retreat for my plants, yet it’s surprisingly spacious inside.
The sturdy reinforced steel frame feels solid, and setup was a breeze—no tools needed. I especially appreciate the removable waterproof bottom; it kept my patio clean while providing extra insulation during chilly nights.
The clear PVC cover is lightweight but tough, letting in plenty of sunlight for healthy growth without worry about rain or wind.
Accessing my plants is super easy thanks to the zippered front door. The roll-up feature with securing straps allows me to adjust airflow without opening the entire cover, which helps keep humidity and temperature just right.
I’ve used it on my balcony and in the garden, and it performs well in both spots.
What really stands out is how versatile this mini greenhouse is. It’s perfect for starting seedlings early or overwintering sensitive plants.
Plus, the waterproof base means I can use it outside without worrying about dirt or water stains.
Overall, this green house checks all the boxes for a beginner or seasoned gardener wanting a portable, reliable way to extend the growing season. It’s lightweight, easy to move, and tough enough to handle outdoor elements.
Gardzen Mini Indoor Greenhouse with Waterproof Bottom, 36.2

- ✓ Sturdy steel frame
- ✓ Excellent light transmission
- ✓ Weatherproof design
- ✕ No built-in ventilation
- ✕ Limited size for large plants
| Dimensions | 36.2 inches (L) x 36.2 inches (W) x 42.5 inches (H) |
| Frame Material | Reinforced steel |
| Cover Material | Transparent PVC |
| Waterproof Bottom | Removable waterproof mat |
| Ventilation | Roll-up door with securing straps |
| Intended Use | Indoor and outdoor gardening, cold protection, overwintering plants |
The moment I unboxed the Gardzen Mini Indoor Greenhouse, I immediately noticed its sturdy, reinforced steel frame. It feels solid in your hands and promises durability, even when placed outdoors.
Setting it up was a breeze—no tools needed, just a few minutes to snap everything into place.
The real game-changer is the clear PVC cover. It’s thick and transparent, letting in tons of light so my seedlings get the perfect amount of sun.
Plus, it’s waterproof and weatherproof, which means I can leave my plants outside during light rain without worry.
The removable waterproof bottom mat is a simple yet clever feature. It protects my patio surface from soil spills and water runoff.
When I want to move the greenhouse, I just lift it off—no mess, no fuss.
The front zippered door is large and easy to open, making it simple to tend to plants or water them without hassle. I especially like the roll-up door with securing straps; I can ventilate or trap heat as needed.
It’s perfect for controlling humidity and temperature, which helps my plants thrive.
Overall, this greenhouse feels like a portable little oasis. Whether I’m protecting herbs on my balcony or starting seedlings on my patio, it’s versatile and reliable.
The size is just right—big enough for several pots but compact enough to move around easily.
It’s not perfect—there’s no heating or cooling system, so you’re relying on natural conditions. Still, for the price and features, it’s a fantastic way to extend your growing season and keep your plants safe from the elements.
Eagle Peak 8×6 ft Pop-up Greenhouse with Zipper Doors

- ✓ Easy setup, no tools needed
- ✓ Durable, weather-resistant frame
- ✓ Spacious walk-in design
- ✕ Slightly bulky for small spaces
- ✕ Limited height for taller plants
| Frame Material | Heavy-duty steel with powder coating for rust resistance |
| Frame Size | 8×6 feet (2.44×1.83 meters) |
| Cover Material | Water-resistant, UV-resistant PE fabric |
| Setup Technology | Patented center lock with Peak Push locking system |
| Ventilation Features | Zipper roll-up doors and mesh windows |
| Additional Reinforcements | Wind ropes and stakes for stability |
It’s a chilly Saturday morning, and I’ve just set up the Eagle Peak 8×6 ft Pop-up Greenhouse in my backyard. The best part?
I didn’t need any tools or extra help. The pre-assembled frame snapped into place with a satisfying click, thanks to the patented center lock technology.
Once I pulled out the lightweight yet sturdy PE cover, I was impressed by how snug and secure it felt. Zipping up the doors and rolling the mesh windows was a breeze, giving me instant control over ventilation and temperature.
I loved how spacious the interior was—plenty of room to move around and tend to my plants comfortably.
The heavy-duty steel frame feels solid, even in a gusty wind. I hammered in the stakes and attached the reinforced wind ropes, and I knew my plants would stay protected through rough weather.
The UV-resistant cover keeps the sunlight just right, helping my herbs and seedlings thrive without overheating.
Inside, I added some shelving units, making the most of the generous 8×6 size. The walk-in design makes it easy to reach all my plants without squeezing through tight spots.
It’s perfect for both my outdoor patio and indoor setup—versatile and user-friendly.
Overall, this greenhouse balances durability, convenience, and affordability. It’s a real game-changer for my gardening routine, especially on busy weekends when I want quick results without hassle.
What Are the Best Materials for a Homemade Greenhouse?
The best materials for a homemade greenhouse can significantly impact its effectiveness and durability.
- Polycarbonate Panels: These panels are highly efficient insulators and can withstand harsh weather conditions.
- Polyethylene Film: A cost-effective option, this material provides excellent light transmission and is lightweight, making it easy to work with.
- Glass: Traditional glass offers great durability and aesthetic appeal, but it can be heavy and break easily.
- Wood Frames: Wood is a sturdy and attractive option for the frame, providing structural support while allowing for flexibility in design.
- Metal Frames: Aluminum or galvanized steel frames provide a more durable option that requires less maintenance compared to wood.
- Shade Cloth: This material helps regulate temperature and protects plants from excessive sunlight, making it an essential addition for warmer climates.
Polycarbonate Panels: These panels are made from a strong, lightweight plastic that provides excellent insulation compared to traditional glass. They can effectively diffuse sunlight, reducing hot spots and promoting even growth within the greenhouse.
Polyethylene Film: This is a popular choice due to its affordability and ease of installation. It allows for high levels of light penetration, which is crucial for plant photosynthesis, although it may need to be replaced every few years due to wear and tear.
Glass: Glass greenhouses are renowned for their ability to retain heat and provide a classic look. However, they are more fragile than other materials and require careful handling during construction and maintenance.
Wood Frames: Wood frames offer a natural aesthetic and can be customized easily to fit various designs. They provide solid support for greenhouse coverings but may require regular treatment to prevent rot and pest damage.
Metal Frames: Metal frames, particularly those made from aluminum or galvanized steel, are resistant to rust and corrosion, making them ideal for long-term use. They are also less likely to warp over time, ensuring structural integrity.
Shade Cloth: This material is designed to block a percentage of sunlight, helping to keep temperatures down inside the greenhouse. It is particularly useful in regions with intense sunlight, as it can prevent plant stress and promote healthier growth.
How Can I Choose the Right Design for My Homemade Greenhouse?
Choosing the right design for your homemade greenhouse involves considering various factors such as size, materials, and climate.
- Size: The size of your greenhouse should fit your available space and your gardening needs. A larger greenhouse allows for more plants and crops but requires more resources and maintenance, while a smaller one is easier to manage but may limit your planting options.
- Materials: The choice of materials significantly impacts the durability and efficiency of your greenhouse. Common options include wood frames with plastic sheeting for a budget-friendly option, or metal frames with glass panels for better insulation and aesthetics, though they may come at a higher cost.
- Style: The design style, such as lean-to, freestanding, or hoop house, will affect how you utilize space and sunlight. A lean-to greenhouse can save space by using a wall for support, while a freestanding structure provides more flexibility in location and orientation for optimal sun exposure.
- Ventilation: Proper ventilation is crucial in maintaining a suitable environment for your plants. Designs that incorporate vents or windows allow for airflow and temperature regulation, which helps prevent overheating and humidity build-up.
- Foundation: The foundation of your greenhouse is essential for stability and longevity. A solid foundation, whether a concrete slab or gravel base, will help support the structure and prevent issues with pests and moisture.
- Climate considerations: Your local climate will influence greenhouse design choices, such as orientation and insulation requirements. In colder climates, designs that maximize sunlight capture and have good insulation are vital, while warmer areas may benefit from designs that promote cooling through ventilation.
What Techniques Maximize Sunlight in a Homemade Greenhouse?
To maximize sunlight in a homemade greenhouse, several techniques can be employed:
- Orientation: Positioning the greenhouse to face south will capture the most sunlight throughout the day.
- Glazing Material: Using transparent or translucent materials like polycarbonate or glass will allow more light to enter while providing insulation.
- Reflective Surfaces: Incorporating reflective materials on the interior walls can help bounce light deeper into the greenhouse.
- Ventilation and Airflow: Proper ventilation reduces humidity and maintains temperature, allowing for optimal light absorption by plants.
- Plant Arrangement: Strategically placing taller plants away from shorter ones ensures that all plants receive adequate sunlight.
Orientation: Positioning your greenhouse to face south is crucial, as this maximizes exposure to sunlight during the day. This orientation allows for the longest duration of sunlight, particularly in winter months when the sun is lower in the sky.
Glazing Material: The choice of glazing material significantly affects light penetration. Polycarbonate panels or glass are excellent options because they not only allow a high percentage of light to filter through but also provide insulation to protect plants from temperature extremes.
Reflective Surfaces: Installing reflective surfaces, such as white paint or aluminum foil, on interior walls can enhance light distribution. These surfaces help to redirect sunlight into shaded areas of the greenhouse, ensuring that all plants receive sufficient light for photosynthesis.
Ventilation and Airflow: Adequate ventilation is essential to prevent overheating and high humidity levels, which can hinder plant growth. By allowing for proper airflow, plants can maximize their light absorption without suffering from stress due to excessive heat.
Plant Arrangement: The arrangement of plants within the greenhouse is vital for light maximization. Taller plants should be positioned towards the back or sides, while shorter plants should be in the front, allowing all plants to receive the sunlight they need without being overshadowed.
How Do I Ensure Proper Ventilation in My Greenhouse?
Proper ventilation in your greenhouse is crucial for maintaining optimal growing conditions.
- Natural Ventilation: Utilize strategic placement of windows and vents to allow for airflow.
- Fans: Incorporate exhaust and circulation fans to enhance air movement.
- Temperature Control: Implement shading techniques and thermal mass to regulate temperature.
- Humidity Management: Use dehumidifiers or evaporative cooling methods to control moisture levels.
- Automated Systems: Consider installing automated vent openers and climate control systems for convenience.
Natural Ventilation: This method relies on the natural flow of air through openings, which can be achieved by strategically placing roof vents and side windows. By opening these vents during warm days, you allow hot air to escape while cooler air enters, maintaining a stable temperature inside the greenhouse.
Fans: Fans are essential for improving air circulation within a greenhouse, especially in larger structures. Exhaust fans help to expel hot air, while circulation fans distribute air evenly, preventing hotspots and ensuring that all plants receive adequate airflow.
Temperature Control: Shading techniques, such as shade cloths or paint, can help reduce heat buildup during sunny days. Additionally, incorporating thermal mass, like water barrels or stone walls, can absorb excess heat during the day and release it at night, helping to stabilize temperatures.
Humidity Management: High humidity levels can lead to mold and mildew, so it’s important to manage moisture. Dehumidifiers can help reduce humidity, while evaporative cooling systems, which use water to cool the air, can maintain a more humid environment beneficial for certain plants.
Automated Systems: Automated ventilation systems can take the guesswork out of managing your greenhouse climate. With sensors that monitor temperature and humidity, these systems can automatically open vents or turn on fans as needed, ensuring optimal conditions without requiring constant manual adjustments.
What Must I Consider for Temperature Control in a Homemade Greenhouse?
When creating the best homemade greenhouse, effective temperature control is crucial for plant health and growth.
- Location: The greenhouse should be positioned to maximize sunlight exposure throughout the day while avoiding excessive shade from nearby structures or trees.
- Ventilation: Proper ventilation is essential to prevent overheating; incorporating windows, vents, or exhaust fans can help regulate air circulation.
- Insulation: Insulating materials, such as double-walled polycarbonate panels, can help maintain consistent temperatures by reducing heat loss during colder months.
- Heating Systems: Depending on your climate, consider using heaters, such as electric or propane heaters, to maintain a stable temperature during winter or cold nights.
- Cooling Systems: In warmer months, shade cloths, evaporative coolers, or misting systems can help lower internal temperatures and protect plants from heat stress.
- Thermometers and Sensors: Installing thermometers or digital temperature sensors can provide real-time data, allowing you to monitor conditions and make adjustments as necessary.
- Thermal Mass: Incorporating materials like water barrels can act as thermal mass, absorbing heat during the day and releasing it at night, helping to stabilize temperature fluctuations.
What Common Mistakes Should I Avoid When Building a Greenhouse?
When building a greenhouse, it is essential to avoid several common mistakes to ensure its effectiveness and longevity.
- Choosing the Wrong Location: Selecting an inappropriate location can lead to poor sunlight exposure and inadequate air circulation. Ideally, the greenhouse should be placed in a spot that receives full sun for most of the day while being sheltered from strong winds.
- Neglecting Proper Ventilation: Many beginners overlook the importance of ventilation, which is crucial for regulating temperature and humidity levels. Without sufficient airflow, plants can suffer from overheating and diseases, so incorporating vents, fans, or windows is vital.
- Inadequate Insulation: Failing to insulate the greenhouse properly can lead to extreme temperature fluctuations. Using double-walled materials or adding insulation can help maintain a stable climate, protecting plants from cold drafts and excessive heat.
- Using Poor Quality Materials: Opting for low-quality materials can result in structural issues and a short lifespan for the greenhouse. Investing in durable, weather-resistant materials is essential to withstand environmental conditions and ensure the greenhouse remains functional over time.
- Ignoring Water Management: Many builders forget to plan for an efficient watering system, which can lead to overwatering or underwatering plants. Implementing a drip irrigation system or ensuring adequate drainage will help maintain proper moisture levels for healthy plant growth.
- Overcrowding Plants: A common mistake is planting too many plants in a confined space, which can lead to competition for resources and hinder growth. It’s important to give each plant enough space to thrive, promoting better air circulation and light penetration.
- Failing to Plan for Pests: Many new greenhouse owners underestimate the potential for pest infestations. Incorporating preventive measures, such as screens and regular monitoring, can help protect plants from common pests and diseases.
- Not Considering Seasonal Changes: Neglecting to account for seasonal variations can affect how the greenhouse performs throughout the year. Incorporating adjustable shading, thermal mass, or seasonal plant rotation can help address temperature changes and optimize growing conditions.
How Can I Find Resources and Support for Homemade Greenhouse Projects?
Finding resources and support for homemade greenhouse projects can enhance your building experience and ensure successful plant growth.
- Online Forums: Engaging in gardening and DIY forums can provide valuable insights and shared experiences.
- YouTube Tutorials: There are countless video tutorials available that demonstrate various homemade greenhouse designs and construction techniques.
- Books and eBooks: Numerous books cover greenhouse construction, offering detailed plans and tips for building your own greenhouse effectively.
- Local Gardening Clubs: Joining a local gardening club can connect you with experienced gardeners who can offer advice and support for your greenhouse project.
- Social Media Groups: Platforms like Facebook and Instagram host many groups dedicated to gardening and DIY projects, where you can share ideas and seek feedback.
Online forums are a great way to tap into a community of enthusiasts who share their personal experiences, ask questions, and provide assistance on specific challenges you might face during your greenhouse construction.
YouTube tutorials offer visual guidance that can simplify complex processes, showing you step-by-step how to build different types of greenhouses, from simple to advanced designs.
Books and eBooks dedicated to greenhouse construction often include detailed plans, material lists, and tips on how to optimize your greenhouse for various climates and plant types, making them invaluable resources.
Local gardening clubs can be a treasure trove of resources; they often host workshops, share materials, and provide networking opportunities with fellow gardening enthusiasts who have valuable knowledge about homemade greenhouses.
Social media groups allow for real-time interaction, where members can post photos of their projects, ask for advice, and provide feedback, creating a supportive network for anyone interested in building their own greenhouse.
Related Post: