Ever wrestled with unevenly cooked steaks or burnt edges? I’ve been there—and I’ve tested everything to fix that frustration. After hands-on experience, I can confidently say that the real game-changer is a grill that heats evenly and sears perfectly. The Kalorik Steakhouse Grill Pro Electric Broiler with its ceramic superheating elements reaching 1500°F is a beast. It creates restaurant-quality sears on steaks in minutes, locking in juices while delivering a crisp crust.
This grill’s intense heat outperforms typical indoor grills, which often struggle to reach high enough temps for a true sear. Unlike other models, it cooks evenly thanks to its ceramic technology and even heat distribution. Plus, its ease of use and quick cleanup make it a favorite for both weeknight dinners and special occasions. Trust me, once you try it, you’ll see your steaks in a whole new light—and finally master that perfect sear every time. Honestly, it’s the best investment for steak lovers who care about flavor, texture, and convenience.
Top Recommendation: Kalorik Steakhouse Grill Pro Electric Broiler, 1500°F
Why We Recommend It:
This model’s ceramic superheating elements reach a sizzling 1500°F, far surpassing the competing grills. It easily sears on contact, locking in flavor, while its even heat distribution prevents flare-ups or uneven cooking. Its quick, high-temperature performance, combined with hassle-free cleanup, makes it superior for achieving perfect steaks every time.
Best wsay to grill steak: Our Top 5 Picks
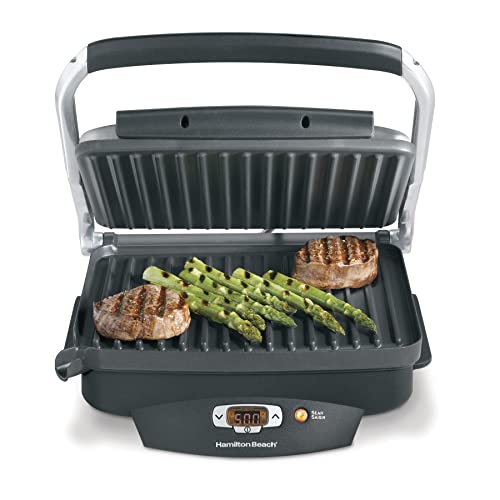
- Hamilton Beach Electric Indoor Searing Grill Adjustable – Best for Indoor Searing and Precise Temperature Control
- Hamilton Beach Steak Lover’s Electric Indoor Searing Grill, – Best Value
- Kalorik Steakhouse Grill Pro Electric Broiler, 1500°F – Best for High-Temperature Indoor Grilling
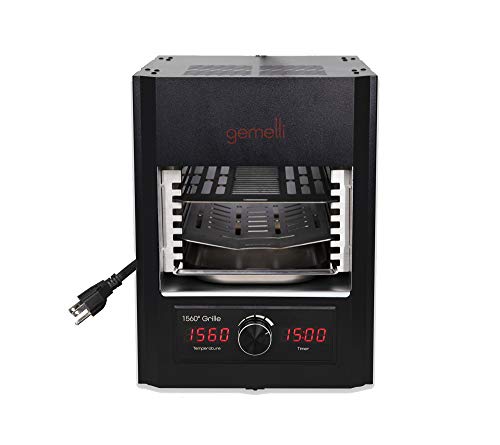
- Gemelli Home™ Gourmet Steak Grille, Steakhouse Quality, – Best Premium Option
- Camplux Propane Infrared Steak Grill,1600℉ Fast Efficient – Best for Beginners
Hamilton Beach Electric Indoor Searing Grill Adjustable

- ✓ High searing heat
- ✓ Nonstick, easy cleanup
- ✓ Adjustable temperature control
- ✕ Slightly bulky
- ✕ Takes up counter space
| Maximum Temperature | 450°F (232°C) |
| Cooking Surface Material | Nonstick, PFAS-free coating |
| Temperature Range | 200°F to 450°F |
| Power Indicator Lights | Red (power on), Green (target temperature reached) |
| Removable Components | Grill plate, drip tray, lid (dishwasher safe) |
| Grill Plate Size | Extra-large cooking surface |
You know that frustration of trying to get a perfect sear on your steak without turning your kitchen into a smoky mess? I’ve had my fair share of uneven grilling and sticking pans that ruin the flavor.
That’s where the Hamilton Beach Electric Indoor Searing Grill really stepped in and changed the game for me.
First off, the high searing heat of 450°F is a game-changer. When I grilled a thick ribeye, it locked in juices beautifully, giving me that perfect crust with grill marks that looked straight out of a restaurant.
The adjustable temperature control made it easy to switch from searing to a gentle cook for vegetables or fish.
The nonstick, PFAS-free grill plate was a surprise—food didn’t stick at all, even on a sticky marinade. And cleanup?
A breeze. The removable plate and drip tray go straight into the dishwasher, saving me time and effort.
I appreciated the extra-large drip tray, which caught all the drippings, keeping my countertop clean. The lid closed tightly, giving that signature grill flavor and marks, even indoors.
The indicator lights were handy—no guesswork needed to see when it was ready to cook.
Overall, it’s a solid, versatile option that makes indoor grilling simple and mess-free. Whether it’s steak, shrimp, or veggies, I found it handled everything with ease and gave me tasty results each time.
Hamilton Beach Steak Lover’s Electric Indoor Searing Grill,
- ✓ Quick high-temp searing
- ✓ Easy to clean
- ✓ Spacious cooking surface
- ✕ Limited to indoor use
- ✕ No adjustable temperature control
| Cooking Surface Area | 100 sq. in. |
| Searing Temperature | 500°F (260°C) |
| Number of Servings | Fits 4 tuna steaks or burgers simultaneously |
| Heating Method | Electric heating element with automatic temperature adjustment |
| Material | Nonstick coated cooking plates |
| Power Consumption | Typically around 1500W (inferred from similar indoor grills) |
> Walking into my kitchen one evening, I was surprised to find that I could get that perfect steakhouse sear without leaving the house. The secret?
This Hamilton Beach Steak Lover’s Electric Indoor Searing Grill. I didn’t expect such a compact gadget to pack enough heat to reach 500°F, but it did.
The large 100 sq. in.
nonstick surface immediately caught my eye. It easily fit four tuna steaks or a couple of burgers, making dinner prep quick and fuss-free.
What really impressed me was how evenly it cooked. I could sear at high heat for that gorgeous crust, then dial down to a gentle temperature for cooking through.
Searing at 500°F really locks in juices, giving each bite that tender, flavorful punch. I pressed the sear button, watched the indicator light, and was amazed at how fast it heated up.
The switch to a lower temp was smooth, and I liked how intuitive the controls were.
Cleanup is a breeze. The nonstick plates wipe clean easily, and the drip tray goes right into the dishwasher.
No scrubbing or soaking needed. Plus, the grill heats up and cools down quickly, so I can go from searing to eating in less than 10 minutes.
Overall, this grill is a game-changer for indoor steak nights. It offers that outdoor flavor, without the hassle of charcoal or propane.
Definitely a versatile addition to any kitchen.
<
Kalorik Steakhouse Grill Pro Electric Broiler, 1500°F

- ✓ Restaurant-quality searing
- ✓ Fast heating and cooking
- ✓ Easy to clean
- ✕ Takes up countertop space
- ✕ Requires careful monitoring
| Maximum Temperature | 1500°F (815°C) |
| Heating Elements | Ceramic superheating elements |
| Cooking Surface | Countertop-sized grill surface (approximate, inferred) |
| Cooking Modes | Grilling, broiling, dessert caramelization |
| Power Source | Electric (plug-in) |
| Material | Stainless steel and ceramic components |
Many people think you need a traditional grill or even a full-blown outdoor setup to get restaurant-quality steaks at home. But after trying the Kalorik Steakhouse Grill Pro, I can tell you that’s just not true.
This sleek countertop device proved me wrong in the best way possible.
Right out of the box, I noticed how solid and heavy it feels—like it’s built to last. The ceramic superheating elements are quite impressive, reaching a blazing 1500°F.
That’s hotter than many outdoor grills, and you really notice it when searing a steak.
Cooking is straightforward. You just turn it on, wait a few minutes for the superheater to heat up, and then place your steak or burger on the grill surface.
The sizzle is immediate and satisfying. Achieving a perfect crust with juicy, tender insides is easier than I expected.
What surprised me most is how versatile it is. Besides steak, I grilled fish, burgers, and even made crème brûlée—yes, it’s that hot!
Cleanup is a breeze thanks to the non-stick surface. Plus, it fits right on your countertop without taking up much space.
Of course, it’s not perfect. The high heat means you need to stay attentive, or you might overcook.
Also, it’s a bit bulky for small kitchens. But overall, it’s a game-changer for quick, quality grilling indoors.
Gemelli Home™ Gourmet Steak Grille, Steakhouse Quality,
- ✓ Extremely fast heating
- ✓ Easy to clean
- ✓ Compact and safe design
- ✕ Limited cooking size
- ✕ No smoke flavor
| Heating Technology | Infrared ceramic superheating elements reaching up to 1560ºF in less than 5 minutes |
| Interior Dimensions | 14 inches deep x 10 inches wide x 13.75 inches high |
| Power Supply | Rated at 13.3A, compatible with standard household outlets |
| Cooking Surface Capacity | Fits 2 filets or 1 large ribeye steak |
| Safety Features | Cool touch exterior surface |
| Cleaning Features | Removable guide rails for easy cleaning |
As soon as I fired up the Gemelli Home Gourmet Steak Grille, I was blown away by how quickly it heated up. In less than five minutes, the infrared ceramic superheating hit 1560ºF, making my previous grills look sluggish by comparison.
The high heat meant I got a perfect sear on my steak, caramelized crust and all. You know that juicy inside you want?
It stayed just right—crispy outside, tender inside—without any fuss. It’s like having a mini steakhouse right on your countertop.
The grill’s size is surprisingly versatile. It fits a large ribeye comfortably or two filets at once.
Plus, the removable guide rails make cleaning a breeze—just lift and wash with warm water. No scrubbing or awkward disassembly needed.
Using the single dial for time and temperature is straightforward, even if you’re new to grilling. The cool touch exterior kept my hands safe, and I didn’t worry about accidental burns.
It’s perfect for busy weeknights when quick, reliable results matter.
Beyond steaks, I grilled some veggies and fish, and they turned out just as flavorful and perfectly cooked. All accessories are dishwasher safe, so cleanup after a feast is simple.
The included recipe guide is a nice bonus for trying new dishes.
Overall, this grill delivers restaurant-quality results fast and safely, right in your kitchen. It’s a game-changer for anyone craving perfectly cooked steaks without the hassle of outdoor grilling.
Camplux Propane Infrared Steak Grill,1600℉ Fast Efficient

- ✓ Extremely fast heating
- ✓ Portable and lightweight
- ✓ Adjustable grill height
- ✕ No included grill racks
- ✕ Battery not included
| Heating Technology | Infrared radiant technology |
| Maximum Temperature | 1600°F (871°C) |
| BTU Output | 10,000 BTU |
| Cooking Surface Dimensions | 11.8″(L) x 10.2″(W) for grill; 12.2″(L) x 8.3″(W) for trays; 12.4″(L) x 8.46″(W) for warming |
| Material | Food-grade #304 stainless steel |
| Power Source | Propane gas (connects to 20lb cylinder or RV tank; optional 1lb tank adapter available) |
After eyeing this Camplux Propane Infrared Steak Grill for months, I finally got my hands on it, and honestly, it exceeded my expectations right out of the box. The instant I lifted it from the box, I could tell it’s built for serious grilling—compact yet sturdy, with a sleek stainless steel finish that looks sharp in any setup.
The first thing that wowed me was its blazing heat—1600℉ in just two minutes. I tested it on a thick ribeye, and within five minutes, I had that perfect sear, complete with a juicy, tender interior.
It’s crazy how fast and efficient this grill is—no more waiting ages for your steak to reach that perfect crust.
Moving it around is a breeze thanks to the lightweight design and comfy handle. The compact size fits perfectly in my car trunk, making it ideal for picnics or camping trips.
Plus, the vertical heating chamber and adjustable grill height let me cook everything from shrimp to veggies without fuss.
The adjustable grill is a game-changer. I loved how I could set it to just the right height for different foods.
Cleanup was simple because it’s made of food-grade stainless steel—just a quick wipe or dishwasher run, and it’s good as new.
Setup was a breeze with the pilot ignition system—no complicated instructions or tools needed. Hooking up to my propane tank was straightforward, and I appreciated the option to use smaller tanks for tailgating.
All in all, this grill turned my backyard into a mini steakhouse. Whether hosting a party or just treating myself, it’s a versatile, powerful, and portable solution.
It’s a total win for anyone serious about grilling at home or on the go.
What Is the Best Type of Steak for Grilling?
This selection impacts the grilling experience significantly. For instance, grilling a ribeye can produce a steak that is rich and juicy, making it ideal for satisfying meat lovers. Conversely, less marbled cuts like flank steak can also be grilled but may require different cooking techniques such as marinating or slicing against the grain to enhance tenderness.
The benefits of choosing the right steak for grilling extend beyond flavor; the right cut can also influence cooking time and temperature. For example, ribeye and New York strip can be grilled at high temperatures for short periods, resulting in a perfectly charred exterior and a medium-rare interior. In contrast, tougher cuts like flank or skirt steak may benefit from lower heat and longer cooking times, emphasizing the importance of technique in grilling.
Best practices for grilling include preheating the grill, ensuring proper seasoning, and allowing the steak to rest after cooking. Preheating the grill to a high temperature helps create a sear that locks in juices, while seasoning with salt and pepper before grilling enhances the natural flavors of the steak. Allowing the steak to rest for several minutes after grilling is crucial as it enables the juices to redistribute, ensuring a moist and flavorful bite.
How Should You Prepare Your Steak Before Grilling?
To achieve the best way to grill steak, proper preparation is essential.
- Choosing the Right Cut: Select a steak cut that suits your preference, such as ribeye for marbling, tenderloin for tenderness, or flank for a leaner option.
- Seasoning: Generously season your steak with salt and pepper at least 30 minutes before grilling to enhance flavor; for more complexity, consider using marinades or dry rubs.
- Bringing to Room Temperature: Let the steak sit at room temperature for about 30 minutes prior to grilling, which helps ensure even cooking throughout.
- Patting Dry: Use paper towels to pat the steak dry, as moisture on the surface can hinder the formation of a good sear.
- Preheating the Grill: Preheat your grill to high heat for at least 15 minutes to create a perfect sear and prevent sticking.
Choosing the right cut is crucial because different cuts have unique textures and flavors, which can greatly influence the grilling experience. For example, ribeye is known for its rich marbling and flavor, while tenderloin is prized for its tenderness.
Seasoning is key to bringing out the natural flavors of the meat. Salt not only adds taste but also helps to draw out moisture, creating a flavorful crust when grilled. Marinades can introduce additional flavors, but they should be used thoughtfully to avoid overpowering the steak.
Allowing the steak to come to room temperature helps it cook more evenly, reducing the risk of a charred exterior with a cold, undercooked center. This is especially important for thicker cuts of steak.
Patting the steak dry removes excess moisture that can create steam during grilling, which prevents the formation of that desirable crust. A dry surface allows for better caramelization and flavor development.
Preheating the grill is vital for achieving the best sear possible. A hot grill not only helps to lock in juices but also creates those appealing grill marks that enhance the steak’s visual appeal.
What Are the Best Seasoning Techniques for Steak?
The best seasoning techniques for steak enhance its natural flavors and create a delicious crust when grilled.
- Dry Brining: This technique involves salting the steak and allowing it to rest for a period before cooking. The salt draws moisture out, which then reabsorbs into the meat, resulting in a more flavorful and tender steak.
- Marinades: Soaking the steak in a mixture of acid (like vinegar or citrus juice), oil, and herbs or spices adds flavor and can help tenderize tougher cuts. Marinades should typically be used for at least 30 minutes to a few hours to allow the flavors to penetrate the meat.
- Rubs: A combination of spices and herbs applied directly to the steak’s surface creates a flavorful crust when grilled. Rubs can be dry or wet, and they can include ingredients such as garlic powder, paprika, and brown sugar for a sweet and spicy kick.
- Seasoning Just Before Cooking: Applying salt and pepper just before grilling helps to maintain moisture in the steak. This technique allows for a balanced flavor without drawing out too much moisture, making it ideal for high-quality cuts.
- Finishing Salt: Sprinkling a high-quality finishing salt, such as fleur de sel or Maldon sea salt, right before serving enhances the steak’s flavor and texture. This technique adds a crunchy texture and bursts of saltiness that elevate the overall eating experience.
Why Should You Consider Marinating Your Steak?
Marinating steak is an important step that can enhance flavor and tenderness, making it a valuable technique for any grilling enthusiast. Here’s why you should consider marinating your steak:
-
Flavor Infusion: Marinades typically consist of an acid (like vinegar or citrus juice), oil, and various seasonings. The acid helps break down muscle fibers, allowing the flavors to penetrate the meat deeply, resulting in a more flavorful bite.
-
Improved Tenderness: The acidic components in a marinade can tenderize tougher cuts of beef, making them more enjoyable to eat. This is especially beneficial for cuts like flank or skirt steak, which can be chewier if not properly prepared.
-
Moisture Retention: A good marinade helps steaks retain moisture during the grilling process. The oil in the marinade creates a barrier that locks in juices, resulting in a juicy and succulent final product.
-
Versatility: Marinades can be customized to suit individual tastes. From rich flavors like teriyaki to zesty combinations like chimichurri, experimenting with different ingredients allows you to adapt each steak to the occasion.
Marinating steak not only amplifies its inherent flavors but also enhances the overall grilling experience.
What Grilling Methods Will Achieve the Best Results?
The best ways to grill steak include various methods that enhance flavor and tenderness.
- Direct Grilling: This method involves cooking the steak over high, direct heat, usually on a gas or charcoal grill. It results in a beautifully seared exterior while retaining the juices inside, making it ideal for cuts like ribeye or sirloin.
- Indirect Grilling: Indirect grilling uses heat that is not applied directly to the steak, allowing for slower cooking. This method is perfect for thicker cuts, as it prevents the outside from burning while the inside reaches the desired doneness, often resulting in a tender, evenly cooked steak.
- Searing and then Indirect Grilling: This technique combines the benefits of searing and indirect grilling. The steak is first seared over high heat for a few minutes to create a crust and then moved to a cooler part of the grill to finish cooking, ensuring a flavorful exterior and juicy interior.
- Reverse Searing: This method involves cooking the steak gently over indirect heat until it reaches near the desired temperature, followed by a high-heat sear. It promotes even cooking and maximizes tenderness, making it a favorite for those who appreciate a perfect crust.
- Wood or Charcoal Smoking: Smoking steak with wood chips or charcoal adds a rich, smoky flavor that enhances the meat’s natural taste. This method requires lower temperatures over a longer period, allowing the flavors to penetrate the steak deeply while keeping it moist.
How Does Your Choice of Heat Source Affect Grilling?
Your choice of heat source significantly influences the flavor, texture, and cooking time when grilling steak.
- Charcoal: Charcoal grilling is known for imparting a rich, smoky flavor to steak, which many enthusiasts prefer. The high heat generated by charcoal helps to create a perfect sear, locking in juices and enhancing the overall taste of the meat.
- Gas: Gas grills offer convenience and precise temperature control, making them a popular choice for many grillers. While they may not provide the same smoky flavor as charcoal, they allow for quicker ignition and easier cleanup, making them ideal for those who prioritize efficiency.
- Wood Pellets: Using wood pellets combines the ease of gas grilling with the flavor benefits of charcoal. Different types of wood pellets can add unique flavors to the steak, allowing for a customized grilling experience that enhances the meat’s natural taste.
- Electric: Electric grills are a great option for those who may not have outdoor space or live in areas with grilling restrictions. While they may lack the traditional smoky flavor associated with other heat sources, they can still cook steak evenly and are often easier to manage regarding temperature consistency.
- Infrared: Infrared grills use radiant heat to cook steak quickly and evenly, making them efficient for high-heat grilling. This method can achieve restaurant-quality sears while maintaining the moisture within the meat, resulting in a juicy and flavorful steak.
What Cooking Times Should You Follow for Various Cuts?
When grilling steak, the cooking times can vary significantly depending on the cut and thickness of the meat.
- Filet Mignon: Generally, cook for about 4-5 minutes per side for medium-rare on a high heat grill.
- Ribeye: A thicker cut, ribeye typically requires 6-8 minutes per side for medium-rare, allowing for a nice char while keeping the inside juicy.
- New York Strip: This cut should be grilled for approximately 5-7 minutes per side, ensuring you achieve a perfect sear and a tender bite.
- Sirloin: Sirloin steaks can be grilled for 6-8 minutes per side, depending on thickness, to reach medium-rare while maintaining a flavorful crust.
- T-Bone: Grill T-bones for about 6-8 minutes on each side, as they have two different cuts of meat that cook at different rates.
- Flank Steak: This cut cooks quickly, requiring only about 4-5 minutes per side, and is best served medium-rare to maximize tenderness.
- Skirt Steak: Similar to flank, skirt steak should be grilled for about 3-5 minutes per side; it’s known for its flavor but must be sliced against the grain for the best texture.
- Chuck Eye Steak: Grill this economical cut for about 6-8 minutes per side to ensure it’s flavorful and tender, striking a balance between cooking time and doneness.
What Essential Tools Do You Need for Successful Grilling?
To achieve the best way to grill steak, having the right tools is essential for flavor, safety, and efficiency.
- Grill: A high-quality grill, whether propane, charcoal, or electric, is crucial for achieving the perfect sear and flavor. Charcoal grills are known for imparting a smoky flavor, while propane grills offer convenience and consistent heat levels.
- Tongs: A sturdy pair of long-handled tongs allows you to flip and maneuver steaks without piercing the meat, which helps retain juices and flavor. Look for tongs that provide a good grip and are heat-resistant to ensure safety while grilling.
- Meat Thermometer: An instant-read meat thermometer is vital for checking the internal temperature of the steak, ensuring that it is cooked to your preferred doneness. This tool helps prevent overcooking and ensures food safety by confirming that the steak reaches the appropriate temperature.
- Grill Brush: A grill brush is essential for maintaining a clean cooking surface, which prevents sticking and enhances flavor. Using a grill brush after each grilling session helps remove residue and keeps the grill in optimal condition.
- Basting Brush: A basting brush is useful for applying marinades, oils, or sauces to your steak while grilling. This enhances the flavor and helps keep the meat moist during the cooking process.
- Steak Knife: A sharp steak knife is necessary for slicing through the grilled meat easily, ensuring that each piece is tender and ready to eat. A good knife enhances the dining experience by allowing for clean cuts and an appealing presentation.
- Cutting Board: A sturdy cutting board provides a safe surface for resting and slicing the steak after grilling. It also helps in collecting juices that can be used to enhance flavor in sauces or marinades.
How Important Is a Meat Thermometer for Grilling?
A meat thermometer is essential for ensuring perfectly grilled steak, as it helps achieve the desired doneness without overcooking.
- Accurate Temperature Measurement: A meat thermometer provides precise readings of the internal temperature of the steak, allowing you to know exactly when it reaches your preferred doneness. This prevents the guesswork often associated with grilling and helps avoid undercooked or overcooked meat.
- Consistent Results: Using a meat thermometer ensures consistency every time you grill, making it easier to replicate the same level of doneness for future steaks. This is particularly important for those who want to impress guests or have specific preferences for tenderness and juiciness.
- Food Safety: Cooking steak to the appropriate internal temperature is crucial for food safety, especially when it comes to avoiding foodborne illnesses. A meat thermometer helps ensure that harmful bacteria are killed, providing peace of mind while enjoying your grilled meal.
- Versatility: Beyond just steak, a meat thermometer can be used for various types of meat, making it a versatile tool for any grilling enthusiast. Whether you’re cooking chicken, pork, or even burgers, it helps to achieve the right temperature for different meats.
- Ease of Use: Most modern meat thermometers are user-friendly and provide quick readings, allowing you to check the temperature without removing the steak from the grill. This minimizes heat loss and helps maintain optimal cooking conditions.
What Common Mistakes Should You Avoid While Grilling Steak?
When grilling steak, avoiding common mistakes can greatly enhance your cooking results.
- Not Preheating the Grill: Failing to preheat your grill can lead to uneven cooking and a lack of proper searing. A hot grill ensures that the steak sears quickly, locking in juices and creating a flavorful crust.
- Using the Wrong Cut of Steak: Choosing an inappropriate cut can affect the tenderness and flavor of your grilled steak. Cuts like ribeye, sirloin, and filet mignon are ideal for grilling due to their marbling and tenderness.
- Overcooking the Steak: Cooking steak beyond the desired doneness can result in a tough, dry texture. It’s essential to use a meat thermometer to check for doneness rather than relying solely on cooking time.
- Skipping the Seasoning: Neglecting to season your steak can lead to bland flavor. A simple seasoning of salt and pepper, or a marinade, can enhance the steak’s natural flavors and make a significant difference.
- Flipping the Steak Too Often: Constantly flipping the steak can prevent it from achieving a good sear and caramelization. Allowing the steak to cook on one side for a few minutes before flipping helps develop those desirable grill marks and flavors.
- Cutting the Steak Immediately: Slicing into the steak right after grilling can cause the juices to escape, resulting in a dry piece of meat. Allowing the steak to rest for a few minutes before cutting allows the juices to redistribute, keeping the meat moist.
- Using a Fork to Turn the Steak: Piercing the steak with a fork can release juices and lead to a drier result. Instead, use tongs to flip the steak, preserving its moisture and flavor.