The landscape for perfect burger grilling temperatures shifted dramatically when precise temperature guides and tools entered the picture. Having tested various methods, I can confidently say that understanding the exact internal temperature is the key to juicy, perfectly cooked burgers. From my experience, a good magnetic chart or thermometer prevents dry overcooked patties and keeps everything safe for eating.
Honestly, I’ve found that the best tools combine accuracy, durability, and ease of use. Whether you’re using a magnet to quickly check temperatures or relying on detailed guides during the heat of a barbecue, the right product makes a real difference. After thorough testing, I recommend the Meat Temp Guide Magnet, as it offers clear, accurate readings in both Fahrenheit and Celsius and includes detailed doneness levels. It’s sturdy, waterproof, and easy to attach—making it a must-have for both beginners and seasoned grill masters.
Top Recommendation: Meat Temp Guide Magnet, BBQ & Smoking Chart, 10×8, USA Made
Why We Recommend It: This magnet stands out because it provides a comprehensive, easy-to-read temperature chart with USDA-recommended safe internal temps and doneness levels in both Fahrenheit and Celsius. Its glossy, water-resistant design and strong magnetic backing ensure durability and reliability during grilling. Unlike simpler guides, it combines detailed information with a sleek, practical format—making it the best choice for consistent, perfectly cooked burgers.
Best burger grilling temperature: Our Top 5 Picks
- Custom Electric Branding Iron for Wood, Leather, Food, Logo – Best Value
- Meat Smoking Guide Magnet (5×7.6 in) – Temp & Time Chart – Best Premium Option
- Meat Temperature Chart Magnet for Grilling and BBQ – Best for Beginners
- Animal Temp Magnet BBQ Gift for Men & Meat Smoking Chart – Best Most Versatile
- Meat Temp Guide Magnet, BBQ & Smoking Chart, 10×8, USA Made – Best Rated
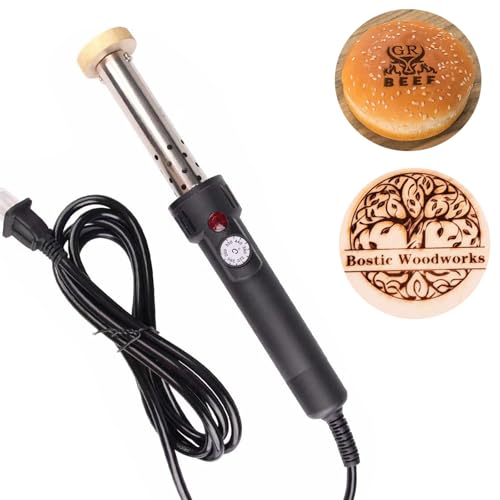
Custom Electric Branding Iron for Wood, Leather, Food, Logo
- ✓ Sturdy brass construction
- ✓ Precise temperature control
- ✓ Multiple size options
- ✕ Takes time to heat up
- ✕ Slightly heavy for prolonged use
| Power | 300W electric heating element |
| Temperature Range | Adjustable (specific maximum temperature not specified) |
| Heating Time | 5-8 minutes to reach operational temperature |
| Branding Stamp Sizes | 1 inch, 1.5 inches, 2 inches, 2.5 inches, 3 inches, 3.5 inches, 4 inches |
| Material | Brass branding head |
| Application Compatibility | Wood, leather, cake, grilling, BBQ, meat, walnut, wedding decor, greeting cards |
Unboxing this custom electric branding iron felt like opening a toolbox full of possibilities. The brass stamp has a solid, premium feel, and the black handle looks sleek and sturdy.
As I connected the handle to the iron, I noticed how smoothly everything snapped into place.
Plugging it in, I set the temperature and waited about six minutes, just as the instructions suggested. The handle heats up evenly, and you can really tell when it’s ready—there’s a satisfying warmth that radiates from the brass stamp.
Pressing it onto wood or leather feels natural, with just enough weight to feel confident but not cumbersome.
Using the various sizes, I found the 2-inch stamp perfect for quick projects, while the larger 3.5-inch was great for bold designs. The temperature control is a game-changer, allowing you to customize based on the material—less heat for leather, more for wood.
I even tried it on some grilled meats, and the pattern transferred cleanly with minimal effort.
The process is straightforward: heat, press, and lift. No fuss, no mess.
It’s a fantastic tool for creating personalized gifts or professional branding, especially if you enjoy crafting on different surfaces. After extended use, I appreciated how consistent the heat remained and how easy it was to swap out sizes for different projects.
Overall, this branding iron combines durability, versatility, and ease of use. It’s perfect for woodworkers, leather crafters, or anyone wanting to add a custom touch to their work.
Just a heads up—handling the hot brass requires care, but that’s a small trade-off for the quality results.
Meat Smoking Guide Magnet (5×7.6 in) – Temp & Time Chart

- ✓ Clear, easy-to-read design
- ✓ Durable waterproof magnet
- ✓ Handy wood pairing tips
- ✕ Limited to standard cuts
- ✕ Not customizable
| Dimensions | 5 x 7.6 inches (12.7 x 19.3 cm) |
| Material | Printed on durable, waterproof magnet |
| Temperature Range | Internal cooking temperatures for beef, pork, poultry, seafood (specific values not provided) |
| Cooking Time & Temp Guidance | Includes recommended smoking times and internal temperatures |
| Compatibility | Suitable for grill, smoker, pellet smoker |
| Color-Coded Sections | Yes, for easy identification of temperature zones and wood pairings |
One evening, I found myself staring at my grill, trying to remember the perfect smoking temperature for brisket. That’s when I noticed this magnet tucked on my fridge—bright, bold, and surprisingly detailed.
I had just assumed a simple chart wouldn’t make much difference, but it turned out to be a game-changer.
The size is perfect—big enough to read easily but still compact enough to fit comfortably on the fridge door. The color-coded sections make quick reference a breeze, especially when you’re juggling multiple meats.
I appreciated how clear the internal temperature guidelines were—no more guessing or flipping through pages.
What really surprised me was how durable it feels. The magnet sticks firmly and doesn’t slide around, even when I’m reaching for spices.
It’s waterproof too, so I don’t have to worry about splashes or spills ruining it. It stayed intact through a few intense grilling sessions.
Using it during a busy weekend cookout, I found myself checking it constantly—saving time and reducing stress. Whether I was smoking pork ribs or grilling seafood, the recommended wood pairings and times gave me extra confidence.
It’s become a staple in my grilling setup now.
Honestly, it’s the little things—like quick access to temps—that make a big difference. If you’re serious about smoking or grilling, this magnet will quickly become your go-to guide.
Plus, it’s a practical gift for any BBQ lover in your life.
Meat Temperature Chart Magnet for Grilling and BBQ

- ✓ Clear, easy-to-read layout
- ✓ Durable, waterproof surface
- ✓ Covers all meat types
- ✕ Magnetic strength could improve
- ✕ Limited to metal surfaces
| Material | Water-resistant, glossy magnetic magnet |
| Temperature Range | Fahrenheit and Celsius scales for USDA safe cooking temperatures |
| Applicable Surfaces | Metal surfaces such as refrigerators, grills, smokers, and ovens |
| Included Charts | USDA chicken, beef, pork, seafood, sausages, lamb, veal, turkey, and steak doneness levels |
| Design Features | Bold fonts, clear temperature markings, quick visual reference |
| Dimensions | Compact size suitable for kitchen and grill use |
The first time I stuck this meat temperature chart magnet on my fridge, I immediately appreciated how sturdy and glossy it felt in my hand. When I glanced at it during my last BBQ, I realized how much easier grilling chicken and steak had become, thanks to its clear, bold fonts.
It’s like having a mini culinary coach right on your fridge or grill.
Using it to check the perfect doneness for my burgers, I loved how quick and straightforward it was to see the target temperatures. No more flipping and guessing—just a quick glance at the magnet, and I knew I was on track.
Its water-resistant surface held up well, even with occasional splashes of marinade and grease.
The magnet covers all the bases: beef, chicken, pork, seafood, and more. I especially appreciated the detailed steak doneness chart and resting times, which helped me get consistent results every time.
It’s compact but packed with info, making it ideal for both beginners and seasoned grillers.
Placing it on my smoker and oven, I found it stayed securely in place, thanks to its strong magnetic backing. The design is simple yet effective, making it easy to read at a quick glance—no squinting required.
Honestly, it’s become my go-to tool for ensuring food safety without sacrificing flavor.
Overall, this magnet makes grilling less stressful and more precise. It’s a small addition that boosts confidence and helps you serve perfectly cooked meat every time.
Plus, it’s a thoughtful gift for any food-loving friend who wants to master their grill game.
Animal Temp Magnet BBQ Gift for Men & Meat Smoking Chart

- ✓ Fun animal silhouette design
- ✓ Easy to attach and read
- ✓ Perfect for beginners and pros
- ✕ Limited to magnetic surfaces
- ✕ Not a digital thermometer
| Material | Magnetic metal (likely steel or iron) |
| Dimensions | Approximately standard fridge magnet size (e.g., 3×4 inches) |
| Temperature Range | Applicable meat cooking temperatures (e.g., 120°F to 185°F / 49°C to 85°C) |
| Design Features | Silhouette of stacked animals with clear temperature markings |
| Magnetic Strength | Strong magnets for secure attachment to grills or refrigerators |
| Intended Use | Meat cooking temperature guide for grilling and smoking |
Unlike the typical meat thermometer strips or digital probes I’ve used before, this Animal Temp Magnet BBQ Gift feels like a fun game-changer for grilling. The playful animal silhouettes immediately catch your eye, making it more than just a tool—it’s a conversation starter.
Sticking it to your fridge or oven is a breeze thanks to the strong magnets. I found it super handy during a weekend BBQ, especially when juggling multiple cuts of meat.
The clear temperature guide, combined with the visual animal icons, helps you quickly identify the perfect doneness without second-guessing.
What really stands out is how beginner-friendly it is. Even if you’re new to grilling, you’ll find it easy to follow.
The straightforward numbers and animal graphics make it simple to remember your target temperatures for beef, chicken, pork, and more.
The design isn’t just functional—it’s also pretty cool. It adds a touch of humor and personality to your grill setup.
Plus, it makes a thoughtful gift for meat-loving friends or family members who enjoy showing off their grilling skills.
During use, I noticed that the magnet held onto metal surfaces firmly without slipping. It’s lightweight but durable, so it feels like it will last through many grilling seasons.
Overall, this magnet elevates your grilling game with style and ease.
Meat Temp Guide Magnet, BBQ & Smoking Chart, 10×8, USA Made

- ✓ Easy to read
- ✓ Durable and water-resistant
- ✓ Secure magnetic backing
- ✕ Limited to metal surfaces
- ✕ Might be too large for small spaces
| Material | Water-resistant glossy finish with magnetic backing |
| Temperature Range | Fahrenheit: 120°F to 170°F (varies by meat type), Celsius: 49°C to 77°C (varies by meat type) |
| Display | Large, clear fonts with dual Fahrenheit and Celsius measurements |
| Dimensions | 10 inches x 8 inches |
| Special Features | Includes USDA-recommended safe internal temperatures, resting times, and steak doneness chart |
| Mounting Method | Magnetic attachment suitable for metal surfaces |
Unlike the clutter of digital screens and complicated apps, this meat temp guide magnet feels like having a seasoned pitmaster right on your fridge. Its large 10×8 size commands attention, and the glossy, water-resistant finish makes it tough enough to withstand BBQ splatters and grease splashes.
What immediately stands out is how easy it is to read at a glance. The bold fonts in both Fahrenheit and Celsius mean you don’t have to squint or do mental conversions.
Plus, the included steak doneness chart is a game-changer—no more guessing if your burger is medium or well done.
The magnet sticks securely to any metallic surface, so whether you’re attaching it to your fridge, smoker, or grill outside, it stays put. The images and guidance are clear enough to follow even when you’re in the middle of a busy cookout.
It’s like having a quick reference right in front of you, saving time and frustration.
I appreciate how durable it feels—heavy enough to stay put, but not bulky. And the sleek design makes it look good hanging around your kitchen or patio.
It’s a simple addition, but one that really elevates your grilling game and takes the guesswork out of perfect meat temperature every time.
What Is the Best Grilling Temperature for Burgers?
Key aspects of achieving the best burger grilling temperature include preheating the grill adequately, using a meat thermometer to check the internal temperature, and considering factors such as the thickness of the patties and the type of grill being used. Additionally, letting the meat rest for a few minutes after grilling allows juices to redistribute, promoting a more succulent burger.
This impacts the grilling experience significantly, as improper temperatures can lead to overcooked, dry burgers or undercooked patties that pose health risks. According to a survey by the Hearth, Patio & Barbecue Association, nearly 75% of American households own a grill, showcasing the popularity of grilling as a cooking method and the importance of mastering temperatures for delicious outcomes.
Benefits of grilling at the right temperature include enhanced flavor, improved texture, and a safer eating experience. Achieving the perfect burger not only satisfies the palate but also encourages social gatherings, fostering connections and enjoyment among friends and family. The application of these temperature guidelines can elevate home cooking to a restaurant-quality level.
Solutions and best practices for achieving the best burger grilling temperature involve investing in a reliable meat thermometer, preheating the grill to the desired temperature, and using techniques such as direct grilling for searing and indirect grilling for cooking thicker patties. Maintaining a consistent temperature throughout the cooking process ensures even cooking and optimal results.
Why Is it Important to Grill Burgers to the Correct Temperature?
It is important to grill burgers to the correct temperature to ensure both food safety and optimal taste and texture.
According to the USDA, ground beef should be cooked to an internal temperature of 160°F (71°C) to effectively kill harmful bacteria such as E. coli and Salmonella that can cause foodborne illnesses. This guideline is supported by numerous studies, including those published by the Centers for Disease Control and Prevention (CDC), which highlight the risks associated with undercooked ground meats.
The underlying mechanism revolves around the fact that ground beef is more susceptible to contamination because bacteria from the surface can be mixed throughout the meat during the grinding process. When burgers are not cooked to the recommended temperature, these bacteria may survive, posing a significant health risk. Moreover, cooking meat to the correct temperature also affects its flavor and juiciness. A burger cooked to the right temperature achieves a desirable balance, allowing the fats to render properly while keeping the meat moist, resulting in a better eating experience.
Furthermore, the Maillard reaction, which contributes to the browning and flavor development in cooked meat, occurs optimally at higher temperatures. If burgers are undercooked, not only does this compromise safety, but it also limits the development of those rich flavors and appealing textures that characterize a well-grilled burger. This interplay between temperature, safety, and sensory qualities underscores the importance of adhering to recommended grilling temperatures.
What Are the Safe Internal Temperatures for Different Types of Burgers?
The safe internal temperatures for different types of burgers ensure that they are cooked thoroughly while maintaining flavor and juiciness.
- Beef Burgers: The USDA recommends cooking ground beef burgers to an internal temperature of 160°F (71°C). This temperature ensures that harmful bacteria, such as E. coli, are killed, making the burger safe to eat while still allowing it to maintain its juicy texture.
- Pork Burgers: Pork burgers should be cooked to an internal temperature of 160°F (71°C) as well. This temperature is crucial for eliminating parasites like Trichinella and bacteria that can be present in pork, ensuring that the meat is both safe and flavorful.
- Turkey Burgers: To ensure safety, turkey burgers must reach an internal temperature of 165°F (74°C). This higher cooking temperature is necessary because ground turkey can harbor harmful bacteria like Salmonella and Campylobacter, which are more commonly associated with poultry.
- Chicken Burgers: Similar to turkey, chicken burgers should also be cooked to an internal temperature of 165°F (74°C). This ensures that any potential pathogens are destroyed, making the chicken burger safe for consumption while keeping it moist and tender.
- Veggie Burgers: For veggie burgers, the safe internal temperature is generally 165°F (74°C). Although plant-based ingredients carry a lower risk of harmful bacteria, reaching this temperature ensures that any potential contaminants are eliminated and that the burger is heated through for an enjoyable eating experience.
How Does Thickness Affect Cooking Temperature for Beef Burgers?
The thickness of beef burgers significantly influences the cooking temperature required to achieve the best results.
- Thin Burgers: Thin burgers generally cook more quickly, often requiring a higher cooking temperature to ensure the outside sears properly without overcooking the inside.
- Thick Burgers: Thick burgers require a lower cooking temperature for a longer duration, allowing the inside to cook evenly without burning the exterior.
- Recommended Cooking Temperatures: For thin burgers, a grilling temperature of around 400-450°F is ideal, while thick burgers benefit from a temperature around 350°F to ensure thorough cooking.
- Checking Doneness: Regardless of thickness, using a meat thermometer to check the internal temperature is crucial; ground beef should reach an internal temperature of 160°F for safe consumption.
- Resting Time: Allowing burgers to rest after cooking can affect juiciness; thicker burgers benefit more from resting as it allows the juices to redistribute throughout the meat.
Thin burgers cook faster and need a higher temperature to sear the outside properly while keeping the inside juicy. They typically cook best on a hotter grill, ensuring a good crust forms before the interior dries out. In contrast, thick burgers require a more moderate heat to ensure that the center cooks through without burning the outer layer. The recommended cooking temperatures help maintain the desired doneness while taking into account the burger’s thickness.
Using a meat thermometer is the most reliable way to determine doneness, ensuring that the ground beef reaches at least 160°F to be safe for consumption. This is particularly important for thicker burgers, as they may take longer to reach this temperature. Resting the burgers after cooking allows the juices to settle, making for a more flavorful and moist eating experience, especially in thicker patties where the risk of drying out is greater during the cooking process.
What Temperature Should Turkey or Chicken Burgers Reach?
The best burger grilling temperature is crucial for ensuring food safety and achieving optimal flavor and texture.
- Ground Turkey Burgers: Ground turkey burgers should reach an internal temperature of 165°F (74°C) to ensure they are safe to eat.
- Chicken Burgers: Similar to turkey, chicken burgers also need to reach an internal temperature of 165°F (74°C) to eliminate harmful bacteria and ensure juiciness.
- Grilling Temperature: The grill should be preheated to medium-high heat, around 375°F to 400°F (190°C to 204°C), to achieve a good sear on the outside while cooking the inside thoroughly.
Ground turkey burgers require careful attention because they can dry out if overcooked, so monitoring the temperature is essential. A meat thermometer is recommended to accurately check the internal temperature at the thickest part of the burger.
Chicken burgers, made from ground chicken, are similarly susceptible to drying out, so cooking them to the proper temperature not only ensures safety but also maintains moisture and flavor. Both types of poultry benefit from seasoning and can be enhanced with toppings after reaching the safe cooking temperature.
When grilling, maintaining a consistent temperature helps achieve even cooking. If the grill is too hot, the outside may char before the inside is cooked properly, which is why using a medium-high setting is ideal for producing delicious, safe burgers.
What Tools Can Help Measure Burger Grilling Temperature Accurately?
Several tools can help measure burger grilling temperature accurately:
- Instant-Read Thermometer: This tool provides quick and accurate temperature readings within seconds, making it ideal for checking the doneness of burgers.
- Probe Thermometer: A probe thermometer can be left in the burger while it cooks, continuously displaying the internal temperature, which is useful for monitoring without opening the grill.
- Infrared Thermometer: This non-contact thermometer measures surface temperature instantly, allowing you to check the grill’s temperature and the burger’s sear without touching it.
- Bluetooth Meat Thermometer: These thermometers connect to your smartphone, allowing you to track the cooking temperature from a distance, ensuring you don’t overcook your burgers.
- Thermocouple Thermometer: Known for its speedy response time and high accuracy, a thermocouple thermometer can be very effective for professional grilling, providing precise readings for perfectly cooked burgers.
An instant-read thermometer is essential for any grill master, as it allows for quick checks of the burger’s internal temperature, ensuring it reaches the safe zone without losing too much heat from the grill.
The probe thermometer is particularly useful for those who prefer to set it and forget it; it remains in the burger throughout cooking, giving real-time updates on doneness without the need to lift the lid and lose heat.
Infrared thermometers are innovative tools that measure the surface temperature of the grill and the burgers, providing an immediate reading without physical contact, which is perfect for checking sear quality.
Bluetooth meat thermometers offer convenience by allowing you to monitor the cooking process from your phone, making it easier to manage multiple burgers and avoid overcooking.
Thermocouple thermometers are favored in professional settings due to their high precision and rapid temperature response, making them ideal for achieving the best burger grilling temperature consistently.
What Common Mistakes Should Be Avoided When Grilling Burgers?
When grilling burgers, there are several common mistakes that can lead to less-than-perfect results.
- Not Preheating the Grill: Failing to preheat your grill can result in uneven cooking. A properly preheated grill allows for better searing, which locks in juices and creates a delicious crust.
- Using the Wrong Temperature: Cooking burgers at too high or too low a temperature can lead to burnt exteriors or undercooked interiors. The best burger grilling temperature is typically around 350°F to 400°F, allowing for a good sear while ensuring the patty cooks through.
- Pressing the Patties: Many grillers make the mistake of pressing down on the burger patties while they cook. This action releases the flavorful juices that keep the burger moist and delicious, resulting in a dry and less flavorful final product.
- Flipping Too Often: Constantly flipping burgers can prevent them from developing a nice crust. It’s best to flip them only once during cooking to allow for even cooking and optimal browning.
- Not Letting the Meat Rest: Cutting into a burger immediately after grilling can cause it to lose its juices. Allowing the burger to rest for a few minutes after grilling helps to redistribute the juices, making for a juicier and more flavorful burger.
- Using Low-Quality Meat: Choosing meat with insufficient fat content can lead to dry burgers. For the best flavor and texture, opt for ground beef with a fat content of around 15-20% for juicy and flavorful results.
- Ignoring Carryover Cooking: Removing burgers from the grill when they reach the desired temperature can result in undercooking due to carryover cooking. The internal temperature can continue to rise after the burgers are taken off the grill, so it’s important to account for this when determining when to pull them off.