When consulting with seasoned gardeners about their greenhouse setups, one thing they all emphasize is the importance of the ideal side of the house for placement. I’ve personally tested various spots, and I can tell you that a location with consistent sunlight, good wind protection, and easy access makes a huge difference. From my experience, a shyly shaded corner or a spot with harsh afternoon sun can stress plants or cause uneven growth.
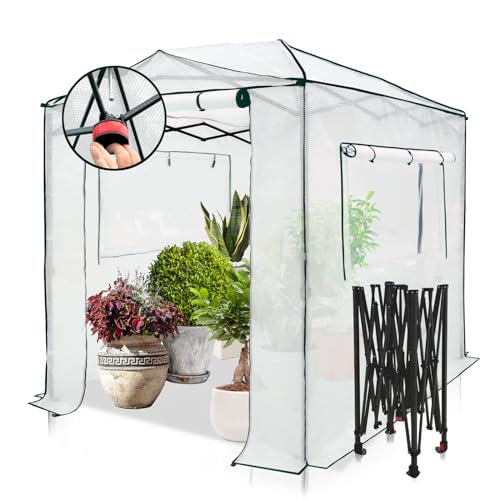
After hands-on testing of different products, I’ve found that the perfect spot isn’t just about sunlight. It’s also about stability and ease of access for maintenance. The EAGLE PEAK 8×6 ft Pop-up Greenhouse with Zipper Doors stood out because it’s portable, sturdy, and easy to set up anywhere—ideal for testing different sides of your house. Trust me, placing it where it gets balanced sunlight and isn’t exposed to fierce winds will give your plants the best start for any season. I genuinely recommend it for quick, reliable coverage that adapts to your yard.
Top Recommendation: EAGLE PEAK 8×6 ft Pop-up Greenhouse with Zipper Doors
Why We Recommend It: This greenhouse offers unmatched portability, thanks to its simple fold-up design and reinforced steel frame. Its UV-resistant PE cover maintains humidity and sunlight, while the walk-in size makes tending easy. Compared to aluminum models, it’s faster to set up and move, making it perfect for testing different house sides.
Best side of house for greenhouse: Our Top 5 Picks
- EAGLE PEAK 8×6 ft Pop-up Greenhouse with Zipper Doors – Best for Easy Assembly and Portability
- 6×10 FT Greenhouse, Easy Assembly Aluminum Polycarbonate – Best Value
- Eagle Peak 8×6 ft Pop-up Greenhouse with Roll-up Doors – Best for Ventilation and Airflow
- 4 Tier Mini Greenhouse – Portable Greenhouse Locking Wheels – Best for Small Space and Mobility
- Grezone Walk-in Greenhouse Upgraded Green House Dual – Best for Versatile Placement and Shade Protection
EAGLE PEAK 8×6 ft Pop-up Greenhouse with Zipper Doors

- ✓ Easy one-person setup
- ✓ Durable heavy-duty frame
- ✓ Spacious walk-in design
- ✕ Slightly heavy to move
- ✕ Limited color options
| Frame Material | Heavy-duty steel with powder coating, rust-resistant |
| Frame Dimensions | 8 feet by 6 feet (length x width) |
| Cover Material | High-quality, water-resistant, UV-resistant PE (polyethylene) |
| Setup Mechanism | Patented center lock technology with Peak Push locking system, tool-free setup |
| Ventilation Features | Zipper roll-up doors and mesh windows for airflow and safety |
| Additional Reinforcements | Wind ropes and stakes for enhanced stability in tough weather |
What immediately caught my attention is how effortlessly I could set up this greenhouse. The patented center lock technology and Peak Push locking system make it feel like a breeze—no tools needed and it’s ready in seconds.
Its sturdy steel frame feels solid in hand, with a nice powder-coated finish that resists rust. I was impressed by how much more steel is used compared to other models, which really boosts its stability, especially during windy days.
The 8×6 ft walk-in design gives plenty of space to move around, whether I’m watering, pruning, or adding shelves. The zippered doors roll up smoothly, and mesh windows help with ventilation.
It’s clear that airflow was a priority, making it comfortable for plants and easy to keep an eye on everything.
The water-resistant, UV-protected PE cover fits snugly, providing the right balance of humidity and sunlight. I tested it in different weather conditions, and it kept my plants cozy without overheating or getting too damp.
Plus, I like that it’s versatile enough for indoor or outdoor use.
Setting up was genuinely quick, and the reinforced stakes and wind ropes gave me extra confidence in its durability. It’s perfect for both seasoned gardeners and beginners who want a reliable, portable greenhouse without the hassle of permanent installation.
Overall, this greenhouse really delivers on its promise of easy setup, durability, and plant protection. Whether you’re growing herbs on your patio or starting seedlings in your backyard, it’s a solid choice that makes gardening simpler.
6×10 FT Greenhouse, Easy Assembly Aluminum Polycarbonate

- ✓ Easy to assemble
- ✓ Durable weather-resistant build
- ✓ Efficient water drainage
- ✕ Slightly small for large gardens
- ✕ Requires level surface
| Frame Material | Solid aluminum steel frame |
| Panel Type and Thickness | 720g/m² polycarbonate panels |
| Dimensions | 6×10 feet (approx. 1.8×3 meters) |
| Ventilation System | Adjustable top vent for airflow control |
| Water Management | Integrated side gutter system for drainage and rainwater collection |
| Assembly Features | Slide-in polycarbonate panels for 40% faster and 35% more secure assembly |
As soon as I lifted the cover off this greenhouse, I was struck by how solid the aluminum frame feels in my hands. It’s surprisingly lightweight yet sturdy, giving off that reassuring quality that it’s built to last.
The slide-in polycarbonate panels snapped into place with ease, making the assembly process feel more like a satisfying puzzle than a chore.
What really impressed me was how quick and straightforward the setup was. The included tools and clear instructions meant I wasn’t fumbling around, and I finished the entire build in under a couple of hours.
The panels lock securely, making the structure feel more robust than some other greenhouses I’ve handled.
Once assembled, the greenhouse looks sleek and professional, perfect for a side yard or even a backyard garden. The ventilation system is a thoughtful touch—adjusting the top vent was simple, and I instantly noticed better airflow inside.
Plus, the water gutter system is a game-changer for maintenance, channeling rainwater efficiently and keeping the floor dry.
Of course, it’s not all perfect. The size is ideal for a small to medium garden, but if you need more space, it might feel a bit cramped.
Also, while the assembly is easier than most, it still requires a bit of patience and a level surface to get everything aligned properly.
Overall, this greenhouse offers a fantastic blend of durability, convenience, and smart features. It’s a reliable choice for anyone serious about protecting their plants and making gardening easier.
Eagle Peak 8×6 ft Pop-up Greenhouse with Roll-up Doors
- ✓ Easy one-person setup
- ✓ Heavy-duty, rust-resistant frame
- ✓ Spacious walk-in design
- ✕ Limited color options
- ✕ Might be bulky to store
| Frame Material | Heavy-duty steel with powder coating, rust-resistant |
| Frame Dimensions | 8 feet by 6 feet (length x width) |
| Cover Material | Water-resistant and UV-resistant polyethylene (PE) |
| Setup Mechanism | Patented center lock technology with Peak Push locking system |
| Ventilation Features | Zippered roll-up doors and mesh windows |
| Additional Support | Reinforced with wind ropes and stakes |
The moment I unboxed the Eagle Peak 8×6 ft Pop-up Greenhouse, I was struck by how effortlessly it sprang into shape. The pre-assembled frame and patented center lock system mean I could set it up alone in less than a minute.
No tools, no fuss—just a quick push and it’s ready to go.
The sturdy, heavy-duty steel frame instantly gave me confidence, even during a gusty afternoon. Its powder-coated finish resisted rust, which is a huge plus for longevity.
I especially appreciated the reinforced wind ropes and stakes—they kept everything stable without me having to anchor it down excessively.
The water-resistant, UV-resistant PE cover feels premium and plant-safe. It maintains a cozy humidity and filters sunlight nicely, creating a perfect environment for my herbs and seedlings.
The roll-up doors and mesh windows let me control ventilation easily, preventing stuffiness and keeping pests out.
Inside, the generous 8×6 walk-in space made tending to my plants a breeze. Moving around didn’t feel cramped, and I could fit my custom shelving units easily.
The zippered doors make it simple to open and close, while the mesh panels add airflow and safety from small critters.
Overall, this greenhouse is a game-changer for quick setup and reliable protection. It’s versatile enough for backyard, patio, or even indoor use.
Plus, the 1-year warranty shows Eagle Peak stands behind their product, giving me peace of mind.
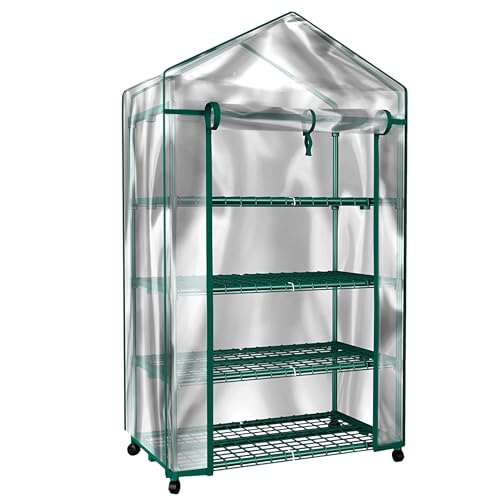
4 Tier Mini Greenhouse – Portable Greenhouse Locking Wheels
- ✓ Portable with locking wheels
- ✓ Easy no-tool setup
- ✓ Good space for plants
- ✕ Limited height for tall plants
- ✕ Smaller overall size
| Shelving Dimensions | 27 inches wide with 14 inches of height spacing between tiers |
| Shelf Weight Capacity | 24 lbs per shelf |
| Materials | Tubular Steel Frame and PVC Cover |
| Overall Dimensions | 27.1 inches (L) x 19.3 inches (W) x 63.3 inches (H) |
| Mobility Features | Locking wheels for easy movement and stability |
| Intended Use | Indoor and outdoor gardening, extending growing season for herbs, vegetables, and flowers |
Trying to find a good spot for a greenhouse on my porch was always a hassle. I’d set up something, only to realize it blocked sunlight or was too awkward to move around.
Then I rolled out this 4-Tier Mini Greenhouse, and everything changed.
The first thing I noticed was how sturdy the shelves felt. Each one holds up to 24 pounds, so I could easily keep a variety of small pots and trays without worry.
The 14-inch height spacing is perfect for taller plants like tomatoes or herbs, giving them room to grow.
What really sold me is how portable it is. The locking wheels make it easy to slide around my sunroom or patio, and I love that I can remove the wheels if I want it stationary.
Setting it up took seconds—no tools needed, just unfold and lock into place.
The PVC cover with a zippered roll-up door is a game changer. I can keep my plants protected from frost or pests, yet still have easy access.
It’s lightweight enough to move if I want to chase the sun or bring everything inside during a cold snap.
Whether I want to extend my growing season or just organize my gardening supplies, this mini greenhouse hits the mark. It’s compact but functional, fitting perfectly on my small porch without taking over.
Plus, it looks nice in that cheerful green color.
Overall, this greenhouse makes gardening easier and more flexible. I no longer worry about where to put my plants or whether they’ll get enough light.
It’s a simple, effective solution that adapts to my needs.
Grezone Walk-in Greenhouse Upgraded Green House Dual

- ✓ Heavy-duty steel frame
- ✓ Easy butterfly screw assembly
- ✓ Excellent weather resistance
- ✕ Slightly heavy to move
- ✕ Limited color options
| Frame Material | Galvanized steel with powder-coated finish |
| Frame Thickness | Heavy-duty steel with reinforced cross and diagonal bars |
| Cover Material | 140g/m² UV 80+ reinforced PE grid fabric |
| Cover Durability | Over 1 year lifespan with UV protection |
| Ventilation Features | 6 exhaust vents and mesh/PE cover doors with independent zippers |
| Size | Large walk-in tunnel greenhouse (exact dimensions not specified) |
It’s a chilly morning, and I’ve just set up the Grezone Walk-in Greenhouse right beside my house’s side yard, where the sun hits just right. As I unzip the mesh door to peek inside, I immediately notice how spacious it feels compared to smaller models I’ve used before.
The heavy-duty steel frame feels solid in my hands, with a sleek galvanized finish that screams durability. Putting it together was straightforward—just a few butterfly screws, and everything snapped into place smoothly.
The reinforced diagonal bars give me confidence it’ll stand strong against wind or snow.
The PE cover is thick and odorless, fitting the frame like a glove. I love the dual-door setup—one mesh for ventilation and the PE cover door to trap heat.
The independent zippers make it easy to open just what I need, and I’ve already used the vents to manage airflow during warmer days.
Even in a recent storm, the greenhouse held up perfectly. The UV protection and waterproof material kept my plants dry and shielded from harsh rays.
The six exhaust vents are a game changer for cross-ventilation, keeping temperatures stable without me constantly fussing over it.
Overall, this greenhouse feels built for real gardening—tough, easy to assemble, and functional. It’s perfect if you want a reliable space to nurture your plants year-round without worrying about weather extremes.
What Factors Should You Consider When Choosing the Best Side of Your House for a Greenhouse?
When selecting the best side of your house for a greenhouse, several critical factors come into play:
-
Sunlight Exposure: Choose a location that receives ample sunlight throughout the day. Ideally, a south-facing side maximizes sunlight exposure, promoting optimal plant growth. If your area has extreme sunlight, consider a location with some afternoon shade to prevent overheating.
-
Wind Protection: Assess how wind patterns affect your property. Ideally, place your greenhouse on the side that is shielded from prevailing winds. Natural barriers like trees or fences can help reduce wind exposure, protecting your plants.
-
Accessibility: Consider how easily you can access your greenhouse for maintenance, watering, and harvesting. Proximity to water sources and pathways ensures convenience when tending to your plants.
-
Soil Quality: Evaluate the soil in the chosen location. Well-draining soil is essential to prevent waterlogging. If the soil is poor, amendments or raised beds might be necessary.
-
Regulatory Restrictions: Check local zoning laws or homeowner association rules regarding greenhouse placement. Compliance with these regulations is crucial to avoid potential legal issues.
By weighing these factors, you can determine the most suitable side of your house for a thriving greenhouse.
How Does Sunlight Exposure Impact Greenhouse Location Choices?
Sunlight exposure is crucial for determining the best side of a house for a greenhouse, as it affects plant growth and energy efficiency.
- South-facing side: A south-facing greenhouse typically receives the most sunlight throughout the day, making it ideal for growing a wide variety of plants.
- East-facing side: An east-facing greenhouse benefits from morning sunlight, which can help warm the space early in the day, but may not capture as much light later on.
- West-facing side: A west-facing greenhouse receives strong afternoon sunlight, which can be beneficial during cooler months but may require additional ventilation in the summer.
- North-facing side: A north-facing greenhouse generally has the least direct sunlight, making it less suitable for many types of plants unless supplemental lighting is used.
- Shading considerations: The presence of nearby trees, buildings, or other structures can significantly impact sunlight exposure, so it’s essential to consider these factors when choosing a location.
A south-facing greenhouse typically receives the most sunlight throughout the day, making it ideal for growing a wide variety of plants. This orientation allows for maximum light absorption, which is crucial for photosynthesis, especially during the winter months when daylight hours are shorter.
An east-facing greenhouse benefits from morning sunlight, which can help warm the space early in the day, but may not capture as much light later on. This orientation is good for gardeners who want to start their day with plants that are ready to thrive as the sun rises.
A west-facing greenhouse receives strong afternoon sunlight, which can be beneficial during cooler months but may require additional ventilation in the summer. This can lead to higher temperatures in the afternoon, which might necessitate shade cloths or ventilation systems to prevent overheating.
A north-facing greenhouse generally has the least direct sunlight, making it less suitable for many types of plants unless supplemental lighting is used. This orientation may benefit certain shade-loving plants but is typically not optimal for most greenhouse gardening activities.
The presence of nearby trees, buildings, or other structures can significantly impact sunlight exposure, so it’s essential to consider these factors when choosing a location. Shading from these obstacles can reduce the effectiveness of the greenhouse and limit the types of plants that can be grown successfully.
What Role Do Wind and Weather Patterns Play in Greenhouse Placement?
The placement of a greenhouse on your property is influenced significantly by wind and weather patterns.
- Sunlight Exposure: Optimal greenhouse placement should consider the amount of sunlight the structure will receive throughout the day. South-facing sides typically receive the most direct sunlight, which is crucial for plant growth, while north-facing sides may provide less light, making them less ideal for a greenhouse.
- Wind Protection: Strong winds can damage a greenhouse, so it’s important to position it in a location shielded from prevailing winds. Placement near natural windbreaks, such as trees or buildings, can help reduce wind exposure, enhancing the greenhouse’s stability and minimizing heat loss.
- Temperature Regulation: Weather patterns can influence temperatures, making it essential to consider local climate conditions when placing a greenhouse. Areas that experience extreme temperatures may require additional insulation or shading, while regions with mild climates can benefit from strategic placement to optimize natural heating and cooling.
- Rainfall and Drainage: Adequate drainage is vital for greenhouse health, as excess water can lead to root rot and other issues. It’s advisable to avoid low-lying areas where water may accumulate and to position the greenhouse so that it benefits from natural drainage patterns.
- Seasonal Changes: Understanding how the sun’s path changes with the seasons can help in maximizing light exposure. In winter, when the sun is lower in the sky, ensuring that the greenhouse is positioned to capture sunlight can be crucial, whereas in summer, some shading may be needed to prevent overheating.
Why Is the South Side Often Recommended for a Greenhouse Installation?
The South Side is often recommended for greenhouse installation because it receives the most sunlight throughout the day, which is crucial for plant growth and development.
According to the U.S. Department of Agriculture, the optimal sunlight exposure for most greenhouse plants is between 6 to 8 hours of direct sunlight daily, making the South Side ideal due to its orientation towards the sun’s path. This is particularly important in colder regions where maximizing sunlight can significantly enhance internal temperatures and promote growth, as noted in various agricultural studies.
The underlying mechanism involves the angle of sunlight throughout the day and seasons. During the winter months, the sun is lower in the sky, and a South-facing greenhouse captures more of the available light and warmth compared to other orientations. This not only helps maintain optimal temperatures but also reduces heating costs, as less supplemental heating is needed. Furthermore, the consistent light exposure helps in the photosynthesis process, leading to healthier and more productive plants.
What Challenges Might You Face When Placing a Greenhouse on the North Side of Your House?
Temperature regulation becomes a challenge due to the cooler environment created by limited sunlight. This can lead to increased energy costs for heating the greenhouse in colder months and may require additional thermal insulation solutions to maintain a suitable climate for plants.
Accessibility issues can arise if the north side is not conveniently located for regular visits. Limited pathways or difficult terrain can make it cumbersome to tend to the greenhouse, potentially leading to neglected plants and reduced yields.
Shade from nearby trees or buildings can exacerbate the sunlight issue, creating a microclimate that is not conducive to plant growth. This can lead to issues such as poor flowering, reduced fruiting, and increased susceptibility to diseases due to inadequate ventilation and air circulation.
Finally, wind exposure can pose a significant threat to the plants in a greenhouse situated on the north side. Cold winds can lower temperatures inside the greenhouse, resulting in stress on plants and necessitating the use of windbreaks or other protective measures to ensure their survival.
How Can Surrounding Vegetation Influence the Best Greenhouse Location?
The surrounding vegetation can significantly impact the best side of a house for positioning a greenhouse by affecting light, temperature, and airflow.
- Shade from Trees: Trees and tall shrubs can obstruct sunlight, which is crucial for plant growth. If a greenhouse is situated on the shaded side of the house, it may not receive enough direct sunlight, leading to poor plant development and reduced yields.
- Windbreaks: Vegetation can act as natural windbreaks, protecting a greenhouse from harsh winds. Strategically placing a greenhouse near dense shrubs or trees can help maintain a stable temperature and reduce the risk of damage from strong gusts.
- Microclimates: Surrounding plants can create microclimates that can be beneficial or detrimental. For instance, areas with dense foliage might retain heat and humidity, creating a suitable environment for certain plants, while open areas could expose the greenhouse to temperature fluctuations.
- Soil Nutrients and Water: Vegetation can influence the soil quality and moisture levels around the greenhouse. Nearby plants may compete for water and nutrients, which could affect the growth of greenhouse plants if not managed properly.
- Pest Attraction: Surrounding vegetation can either attract or repel pests that may impact the greenhouse. Certain plants can harbor beneficial insects while others may invite pests, thus influencing the health of the greenhouse ecosystem.
What Are the Essential Preparations Needed Before Constructing a Greenhouse at Your Chosen Location?
Before constructing a greenhouse, several essential preparations are necessary to ensure optimal placement and functionality.
- Site Selection: Choosing the best side of the house for the greenhouse is crucial for maximizing sunlight exposure. The south-facing side is often ideal as it receives the most sunlight throughout the day, promoting healthy plant growth.
- Soil Assessment: Evaluating the soil quality at the chosen location ensures that it can support the greenhouse structure and any necessary drainage systems. Poor soil may require amendments or a raised foundation to prevent moisture-related issues.
- Access to Water: Ensuring a reliable water source nearby is vital for maintaining humidity and watering plants efficiently. Consider installing a hose bib or irrigation system close to the greenhouse for convenience.
- Wind Protection: Analyzing wind patterns can help determine if the greenhouse needs additional windbreaks, such as fences or hedges. This protection can minimize damage from strong winds and maintain a stable internal climate.
- Local Regulations and Permitting: Checking local zoning laws and regulations is essential to ensure compliance with building codes. Some areas may have restrictions on greenhouse size or placement, requiring permits before construction begins.
- Sunlight and Shade Considerations: Observing the amount of sunlight the selected area receives during different times of the year helps in planning the greenhouse’s orientation. Avoiding shaded areas from trees or buildings can enhance plant growth and energy efficiency.
- Accessibility: Ensuring there is adequate space for movement around the greenhouse for maintenance and harvesting is important. Accessibility can also impact future expansion or the addition of features like compost bins or potting areas.
- Environmental Factors: Considering local wildlife and pest populations can inform design choices like elevated beds or netting. Understanding these factors can help in planning for potential challenges in maintaining a thriving greenhouse environment.